This guide is drafted to make the users knowledgeable about the simple Office 365-to-Office 365 migration with their own Kernel Migrator for Exchange ver 18.3. It includes all the required steps and added provisions in easy words in detail for a quick and successful migration.
As we know, businesses are continuously growing by adopting Office 365 as data storage client. The experts are fascinated to the newly introduced features in each new version of Office 365. As a result, they wish to migrate data between Office 365 tenants.
- Step by Step Guide for Migrating Office 365 to Office 365 Tenant Part-1
- Step by Step Guide for Migrating Office 365 to Office 365 Tenant Part-2
- Step by Step Guide for Migrating Office 365 to Office 365 Tenant Part-3
Manual way to perform this type of migration is currently unavailable. So, we will use an always ready-to-perform Kernel Migrator for Exchange tool for Office 365 to Office 365 migration.
Prerequisites – Office 365 to Office 365 migration
Before starting or going to Office 365 to Office 365 (different account), the users must have the following requirements fulfilled.
- Any of the Microsoft Outlook version – Outlook 2007, Outlook 2010 and Outlook 2013 must be installed in the system on which tool will be used
- Users should be the Global Administrator
- User should have right on source or target or both Office 365 mailboxes as per migration requirements.
- User should be a delegate with Full Access permission over all the mailboxes you want to access in Office 365
Perform migration between your Office 365 tenants in easy way
After discussing user’s need for migration, it is the time to understand the method of migration used by Kernel Migrator for Exchange. There are steps to migration with a definite function which needs to be followed for successful migration. We are going to discuss each step required for migration in detail –
- Pre-migration Analysis and Settings
- Migration of Mailboxes and Public Folders
- Post migration jobs
Pre-migration Analysis and Settings
Let us start with the Pre-migration analysis function which is optional but useful for estimating the almost accurate time required for migration.
Pre-Migration Analysis for Office 365
Perform the steps one after another for pre-migration analysis.
- Start the software application and select the option Pre-migration on the bottom-right of the welcome screen.
- Click the (+) button to add a pre-migration job.
- Here, select the mailboxes you wish to migrate. You can find specific mailboxes by entering specific keywords in Mailbox Name, Email Address and Load Agent search filters. Make selection and click Next.
- You get the summary report in this step. Revise it and click Finish accordingly.
- In the Pre-migration page, you get information about Total Items, Total Folders, Total Size, Approximate Time and Status of mailboxes for migration.
Image may be NSFW.
Clik here to view.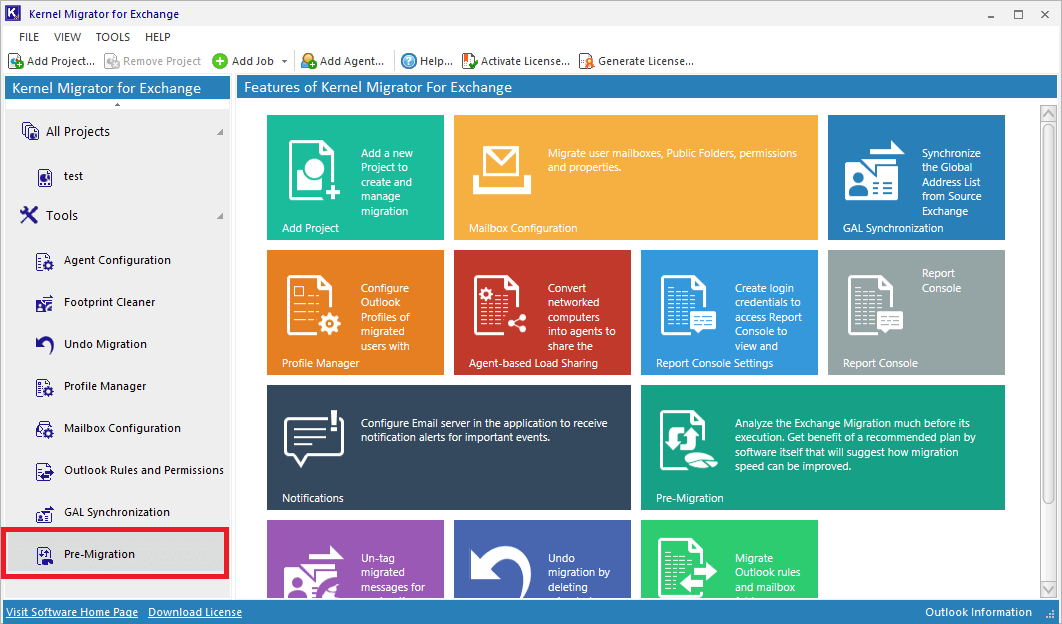
Image may be NSFW.
Clik here to view.
It opens a dialogue box Add pre-migration job. Provide the required details Job For, Job Type including source Office 365 Username and Password. You can also use existing outlook profile for migration as well, provide your network speed and number of agents for load sharing (if want to assign). After all entries, click Next to continue.
Image may be NSFW.
Clik here to view.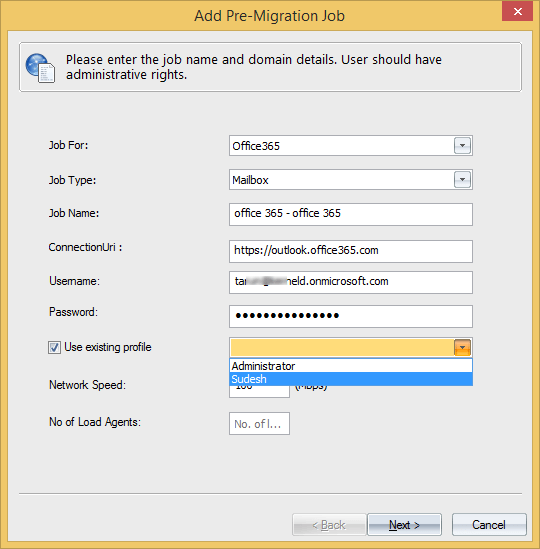
Image may be NSFW.
Clik here to view.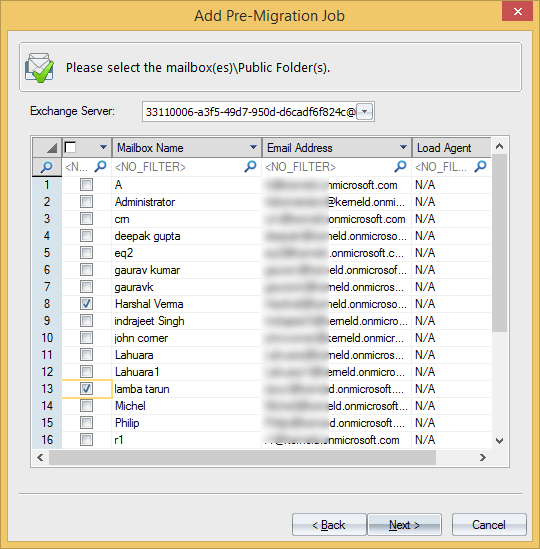
In this page, you can set filters on Message Classes, Date range and Folders criteria.
You can add and remove the message classes for your mailbox items.
Image may be NSFW.
Clik here to view.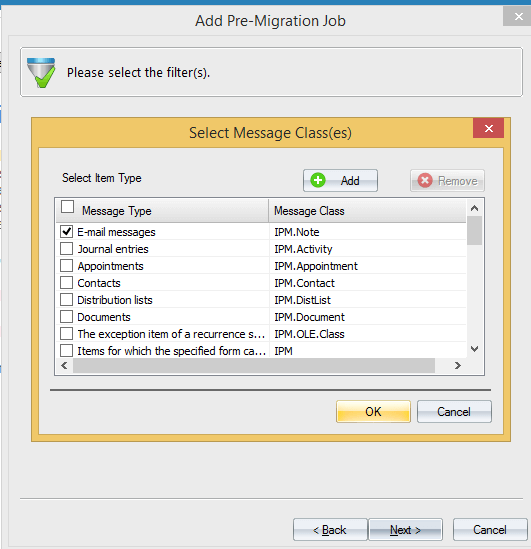
You can include or exclude a specific date range for the mailboxes filtering.
Image may be NSFW.
Clik here to view.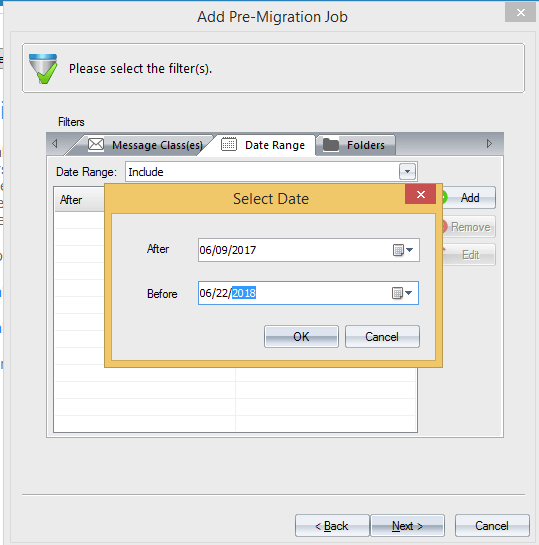
Similarly, you can include or exclude specific folders of mailboxes. Click Next.
Image may be NSFW.
Clik here to view.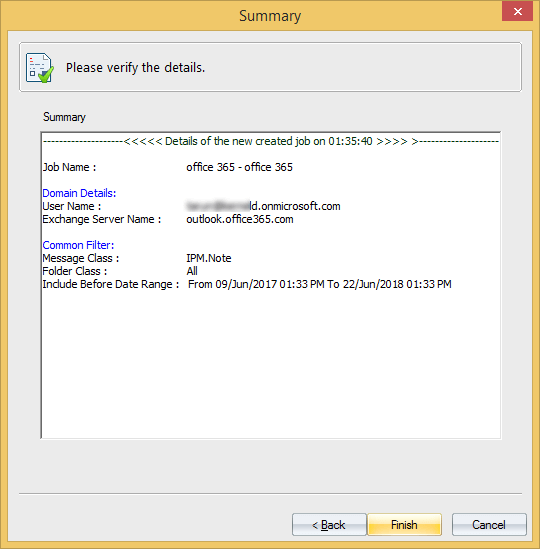
Image may be NSFW.
Clik here to view.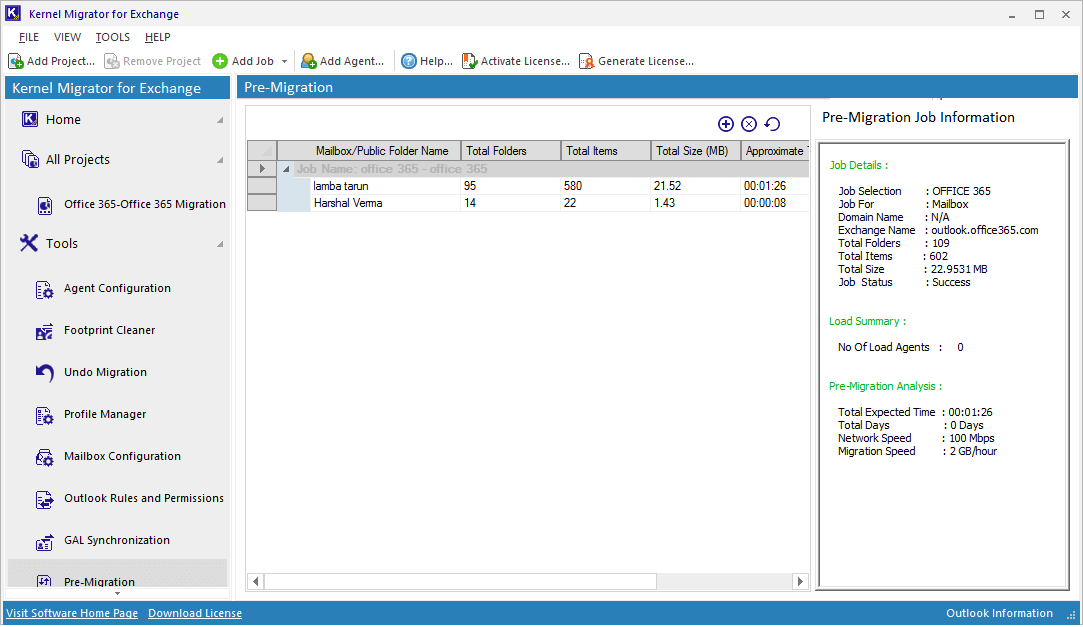
Note: The software provides facility to migrate public folders’ mailboxes (individually) of one Office 365 account to another also. So, you can have a pre-migration analysis for this migration as well in the similar way. (Just select public folders in place of mailboxes).
Image may be NSFW.
Clik here to view.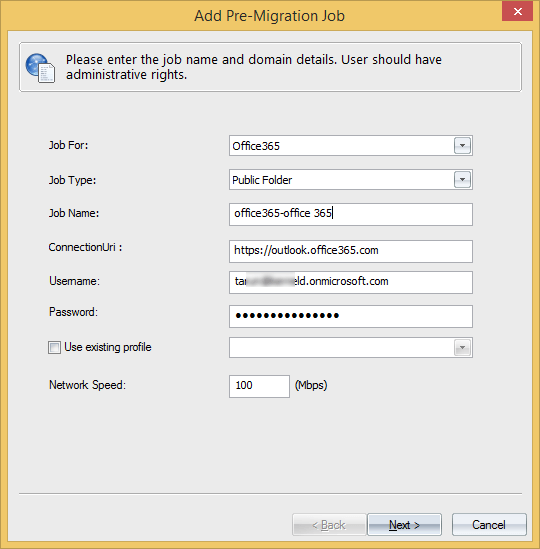
Advanced Settings for Job
Users can apply settings for their jobs like – Report Console Settings, Notification Settings and Log Settings. Let us discuss each one-by-one.
Report Console Settings
Through this setting option, you can access Report console with your provided login credentials for viewing details of the migration jobs created by the software.
Follow the steps to apply the settings for Report Console.
- At the home screen page of the tool, go to Tools>Report Console Settings.
- Click Add option to Add New User.
- Now, provide the asked details like User name, Password and Job Rights (Start and Stop means report for start and finish of the job). Click OK.
Image may be NSFW.
Clik here to view.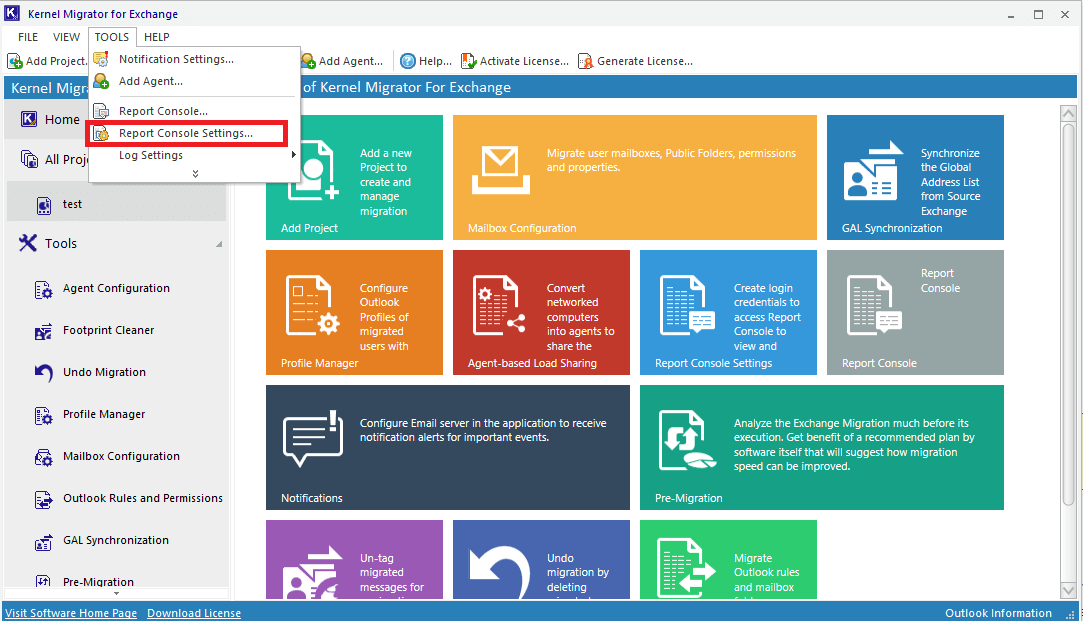
Image may be NSFW.
Clik here to view.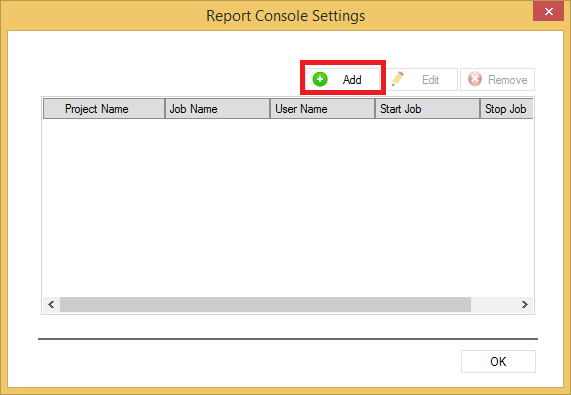
Image may be NSFW.
Clik here to view.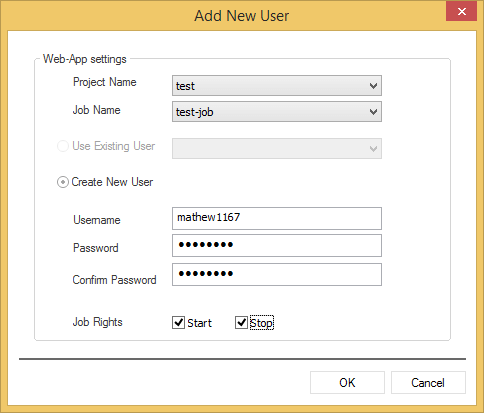
Hence, you can view these settings when you open Report Console to view your migration job details post migration.
Notification Settings
With this Settings option, you can configure an email server in the tool through which email notifications alerts would be received.
To do this, perform the given steps.
- At the home screen, go to Tools>Notification Settings.
- Provide the details needed for Server Settings – Username and Password for authentication. You also need to provide Email address of the sender, email-subject prefix and check box to enable SSL (if needed).
Image may be NSFW.
Clik here to view.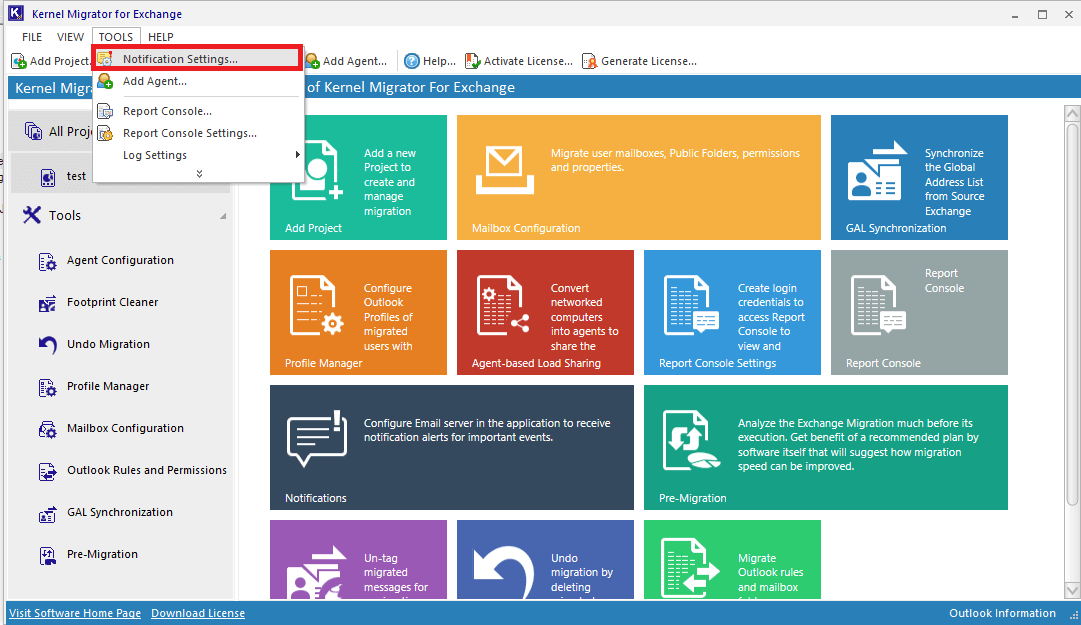
Image may be NSFW.
Clik here to view.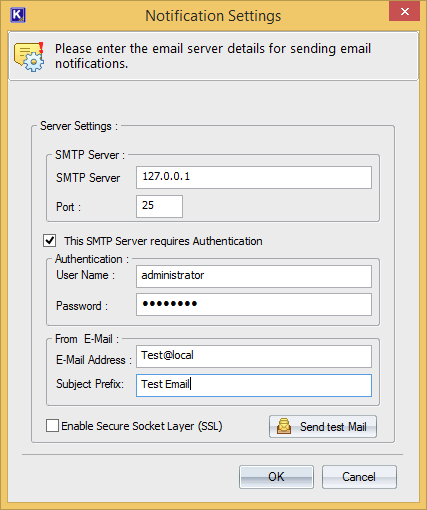
You can verify the email server configuration by clicking Send Test Mail option.
Log Settings
This settings option allows you to either enable or disable logging of mailbox, public folders configuration and synchronization jobs.
Note: Disabling the mailbox configuration and synchronization jobs helps in avoiding large consumption of storage space by files.
By simply clicking on the option would enable or disable the logging of job. Checkmark On means logging is enabled while checkmark absence means logging is disabled.
Image may be NSFW.
Clik here to view.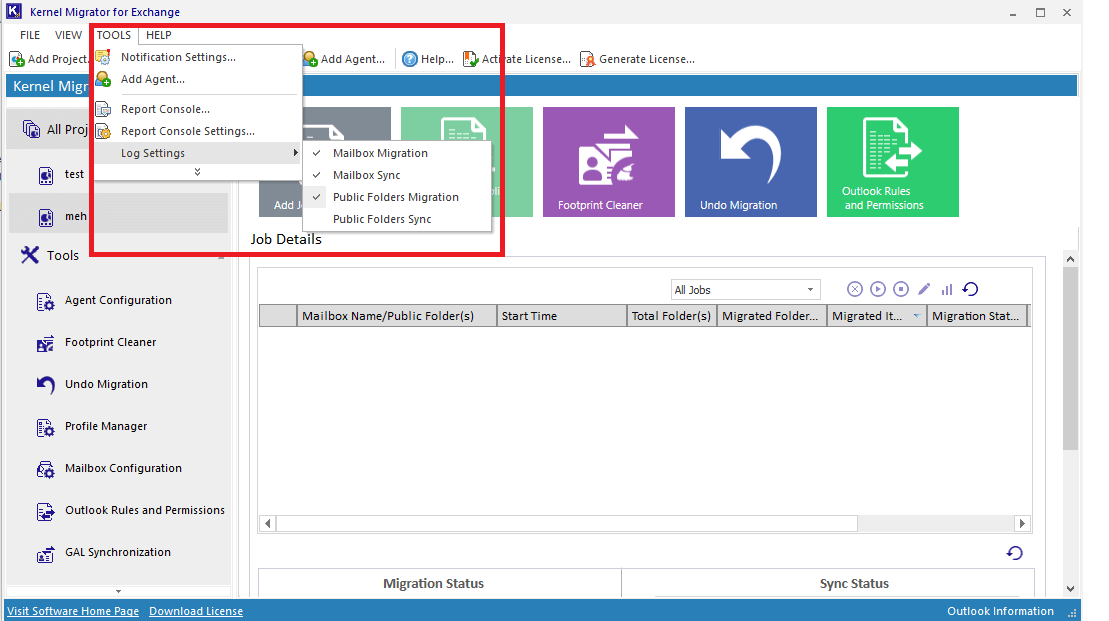
The post Step by Step Guide for Migrating Office 365 to Office 365 Tenant Part-1 appeared first on Kernel Data Recovery.