Quantcast
Channel: Email Conversion – Kernel Data Recovery – Wide range of data recovery softwares
Viewing all 78 articles
Browse latest View live

How to Open and Read Bulk EML Files in Outlook Environment?

$
0
0

Outlook Express uses EML file format to store its email message in a plain text file. Although, this file can be opened and read in several other email programs, besides Outlook: like Apple Mail, Mozilla Thunderbird, Microsoft Entourage, The Bat!, and IncrediMail. However, if you are an Outlook user, then it would be difficult for you to directly open and access EML supported email messages in old versions of Outlook environment.

There is no dearth of tools that can offer the platform to only view and read EML files data without requiring MS Outlook platform. But if you want to permanently import EML files in Outlook program then you have to convert EML files to PST files. Because Microsoft Outlook accepts only Personal storage table (PST) files as its default data file.

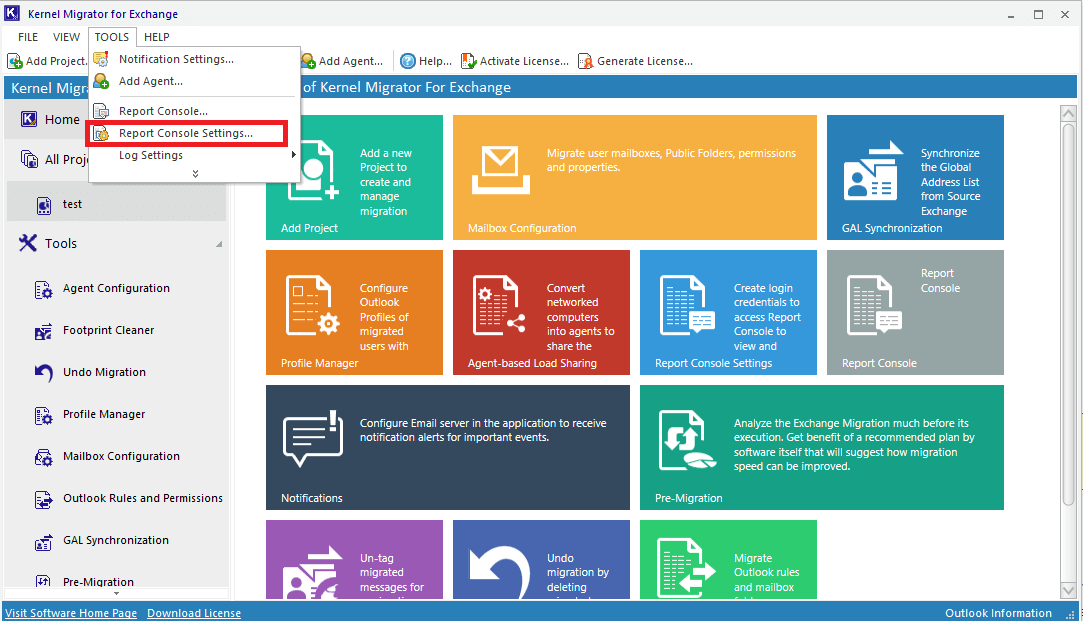
How to Import EML Files in Outlook?

Importing EML files can be a time-consuming task, as it requires the installation of Windows Live Mail as a mode of mode of medium. Although, if you want to import small amount of EML files then you can use “Move to Folder” option available on Outlook program to save EML based email messages.

In order to move bulk EML files to Outlook, follow the below given procedure carefully:

At first download Windows Live Mail program on your PC, if you don’t have it.

  1. Launch Windows Live Mail on your host machine.
    If it reminds you to add an account on WLM, then cancel it. Eventually there is no necessity as it even permits you to open it without configuring an account.
  2. Now launch Internet Explorer and open the respective folder comprising EML files.
  3. Resize and place the windows of both (Explorer and WLM program) in such an order that you can easily manage them together. For instance, part one at the left half of screen and other one on the right side. Also, you can split them top and bottom of the screen, as per your convenience.
  4. Simply use the Drag & drop method to transfer the EML files from Explorer window to the ‘Message List’ of Windows Live Mail.

If you prefer to keep EML files separately in different folders during the transition, then sort multiple folders in Explorer and drop them accordingly in the folder list of Windows Live Mail.

Additionally, see the note below.

  1. In Windows Live Mail: Go to File, and then select Export email and click on Email messages
  2. Select: Microsoft Exchange
  3. Here validate that you want to export to MS Outlook or to Microsoft Exchange.
  4. When displayed, then simply press OK or choose the respective Outlook profile.
    Microsoft Outlook will be initiated in the background that would a little time or if you don’t want to wait simply launch Outlook application manually.
  5. In Export Messages window, click: Selected folders.
  6. Choose the folder that has email messages, as guided in Step 5.
  7. If there are multiple folders, then press the CTRL button while select the desired folders that you want to export.
  8. Click OK.
  9. Click Finish button.
  10. Locate the folder(s) holding your exported email messages in Outlook program.

This is how you can export and read EML files data in Outlook environment. The subfolders of Outlook that you have sorted in WLM may appear on the top-level folders of your Outlook mailbox.

However, if you are unable to move complete items of EML files to Outlook or find integrity issues in the migrated data, then do not hesitate to take the help of a reliable EML to PST conversion tool, to avoid all such compromises. Kernel for EML to PST is a powerful tool to perform easy migration of EML files to Outlook PST files in three simple steps, i.e. scan, repair and save. It even allows you to convert EML files to fresh PST file or adding to an existing PST file. This EML to PST converter strictly ensures data integrity during the conversion of bulk files and therefore maintains exact meta properties of email upon conversion (including to, subject, from, date fields etc.). Besides the option to export EML to PST, this program even facilitates the option to migrate EML files to Office 365 mailbox.

To know more about Kernel for EML to PST visit: https://www.kerneldatarecovery.com/eml-to-pst-converter.html


Ways to export Exchange mailboxes to Outlook Data File (PST)

$
0
0

Facility to export user mailboxes to PST is a primary requirement for Exchange administrators in many organizations irrespective of the size of the organization and the nature its business. Most of the time, they want to back up their mailboxes, mainly for legal and compliance requirements. And it is easy to move PST files from one device to another. Also, EDB to PST conversion can help them in recovering mailboxes from corrupt EDB files. Many recovery tools employ this strategy for recovering Exchange data. And Exchange has inbuilt facilities to export data to PST, though they vary in different versions.

The need for EDB to PST export

  • Compliance requirements – Emails and other mailbox data can be exported to a PST file for legal and compliance related requirements
  • Mailbox backup – Backing up individual mailboxes as PST is easier than creating backups for the entire database (using backup utilities)
  • Mailbox recovery – Mailboxes can be recovered from corrupt EDB files by converting them to PST (third-party tools required)

EDB to PST Conversion options

The extraction mailboxes to PST from EDB can be done with Microsoft utilities. Here, we will discuss ExMerge and the New-MailboxExportRequest cmdlet.

  • ExMerge

ExMerge (Microsoft Exchange Mailbox Merge Wizard) is no longer relevant (as it was a tool for the earlier versions of Exchange). However, it is with this tool the Exchange administrators learned the practical advantages of exporting mailboxes to PST. Microsoft provided this tool for free download, and Exchange administrators used it extensively. Here is how it helped them to export Exchange mailboxes to PST:

Before starting, make sure you have downloaded ExMerge and configured it properly. Also, you must have the required permissions (Receive As/Send As) on the database. A service account is the best option to use ExMerge.

  1. Launch ExMerge from C:\Program Files\Exchsrvr\bin folder. Click Next on the Welcome screen.

  1. Choose Extract or Import (Two Step Procedure) in the Procedure Selection screen and click Next.
  2. Select Step 1: Extract data from an Exchange Server Mailbox and click Next in Two Step Procedure screen.
  3. Provide the login credentials and click Next in Source Server screen.
  4. Select the required mailboxes in the Mailbox Selection screen and click Next.
  5. Select the Locale (the one Exchange Server is using) and click Next in Locale Selection screen.
  6. Click Change Folder button and choose the desired location (folder) where you wish to save the extracted PST files. Click OK. Then click Next,
  7. To save the current settings, click Save Settings (optional step). Click Next.
  8. The progress will be displayed on the Process Status screen. When it is complete, click Finish.

Now you can go back to the selected folder to view the PST files there. And these PST files can be accessed using MS Outlook.

  • New-MailboxExportRequest

The newer versions of Exchange use Shell cmdlets to perform the PST export operation (of course, the latest versions have GUI option too). And the PST files can be exported to any network share folder Exchange has access to. Here is how you can do this in Exchange 2013 (any user assigned to Mailbox Import Export role can perform this action):

To export mailboxes to PST, execute the following cmdlets in Exchange Management Shell:

New-MailboxExportRequest -FilePath -Mailbox

If you want to export an archive mailbox, use the same cmdlets with –IsArchive switch.

Note: If you are unable to connect to the PST file (with an error statement), verify that you have the required permissions to export to PST file.

Do you need to look beyond native options for exporting mailboxes to PST?

There are many occasions when administrators have to look beyond native options for converting EDB to PST. Though content filtering and multiple mailbox migration can be done with the Shell cmdlets, the procedure is not simple as in many professional Exchange recovery tools like Kernel for Exchange Server. And when the Exchange database is corrupt, recovery tools help to convert EDB files to PST format so as to restore the inaccessible mailboxes. Moreover, accomplishing the export task from a friendly interface is preferred even by technically brilliant Exchange administrators.

How to Export MBOX File from Your Gmail Account, And Restore Gmail Exports Back to Gmail Account

$
0
0

When you’re using Gmail for your email communication, then a good thing is that it doesn’t require any additional resource (like third-party software) to export or backup your mailbox data. All your messages, and items of Gmail account can be downloaded via POP and IMAP. It’s easy to backup, export, and import your data—all you need is to sign into your account, and create an archive.

Gmail uses a single text file format to store its emails (in concentrated format—each message is saved one after the other). Also, it allows the users to restore the messages in other emailing platforms, like Apple Mail (MBOX), and Outlook PST file.

MODULE I: Export MBOX file from Gmail Account

Here’s how you can export your Gmail items in MBOX format.

Steps to download the copy of your Gmail mailbox in MBOX format.

  1. To download, select message(s), launch your Google Mail by setting a label. For example, select “messages to download,” to download only the message(s) that are important to you.
  2. Go to https://takeout.google.com/settings/takeout
  3. Select “Select None”
    Note: Thunderbird can save only emails, as it cannot hold other data.
  4. Scroll down to “Mail”, select the gray X to the right
    • To download only selected messages, click “All Mail”
    • Check “Select Labels”
    • Verify the labels that you want to download
  5. Hit “Next”.
  6. Do not alter the file type, select “Create Archive”.
  7. The zip file is sent through your chosen delivery method. The default method sends the zip via email, containing the download link. However, the download may not be instant, as it depends upon the size of the emails you are downloading— the heavier the file is, it longer it will take to create your archive.

MODULE I: Restore Emails from MBOX file in Gmail Account using Gmail Exports

To import your Gmail items (MBOX file) into Gmail account, you have to use additional resources like installation of Thunderbird platform, and an add-on. You can use the MBOX file (as demonstrated in the previous method), containing all your email records in it.

Use the following instructions to import all emails from MBOX file to your Gmail Account

Phase I

Integrate Thunderbird with your Gmail Account

  1. Download and install Thunderbird program
  2. Start Thunderbird program, and select Create a new account: Email.
  3. Choose “Skip this and use my existing email” option to proceed.
  4. Provide your valid credentials like: name, Gmail email address, and Gmail password, and select “Continue”.
  5. Ensure IMAP is selected, and then hit “Done” to save settings. Thunderbird automatically restore settings, if using Gmail.
  6. Your Gmail account is displayed on the left-side of the screen and you can view your all emails.

Thunderbird is now fully setup with your Gmail account

Phase II

Download a Thunderbird Extension—ImportExportTools

  1. Use this link: to https://addons.mozilla.org/en-us/thunderbird/addon/importexporttools/ to download Thunderbird add-on “ImportExportTools” on your machine.
  2. Before clicking “Download Now” button, ensure that the extension supports MBOX files. Store the extension file, at the same location, where you stored the .xpi file.
  3. Launch Thunderbird program.
  4. Go to the menu, and click “Add-Ons”.
  5. When Add-ons Manager tab opens, reach the gear icon, and click “Install Add-on From File”
  6. Provide the .xpi file location, and follow the download instructions precisely.
  7. Restart Thunderbird program.

Phase III

Import MBOX file emails, label it before the export

  1. Launch Thunderbird application.
  2. On the navigation pane, right-mouse to select “Local Folders”. Now import MBOX file to a local folder. Click ImportExportTools, and then select Import MBOX file.
  3. From the option, select “Import directly one or more MBOX files” and click ‘OK’
  4. Browse the folder location, where you extracted the MBOX files. Choose MBOX file that you have labeled and you want to import (as shown in Module I). Click ‘Open’ to proceed.
  5. All emails will now start importing to the user-defined location.

Phase III

Import emails to Gmail Account

  1. Launch Thunderbird application.
  2. In the navigation pane, expand “Local Folders”. Now select the corresponding labelled folder that you want to import in Gmail.
  3. Select all emails in the folder, right-click the mouse and select ‘Copy to – – ‘.
    Note: gmail_account = email address of Gmail account, and label_name = the path to the label folder that you wish to import in Gmail.
  4. All emails will import to the labelled folder that you have selected. Importing may take some time to upload all MBOX emails to your Gmail Account.

Once the import process is completed, all the emails (MBOX file) are reflected in your labeled folder of your Gmail account. Log in to your email Gmail account to view and access them. However, if you find any difficulty in exporting MBOX files to Gmail account, then opt for a third-party MBOX to PST converter for safe and effortless email migration to Gmail Account and other platforms.

Want to import MBOX emails to Outlook? Do this

$
0
0

Email clients such as Thunderbird, Apple Mail, Entourage, Claws Mail, PocoMail, Netscape, Spicebird, SeaMonkey, Eudora, Evolution, Sylpheed, Opera, Mulberry and many more use MBOX format to store email data. Effectively, MBOX is the most widely used file format to store email data.

Though the MBOX is popular, MBOX email client users face some issues like:

  • Cannot import MBOX files to Outlook
  • Unable to deal with MBOX errors and issues

We will discuss all these problems with their appropriate solutions.

Cannot import MBOX files to Outlook

A major problem faced by MBOX users is the incompatibility of MBOX format with MS Outlook. One cannot import MBOX file directly to MS Outlook too.

Solution

Well, there is no such direct method to import MBOX files into MS Outlook. But users use some intermediate email clients like Outlook Express to copy MBOX emails to Outlook. But these indirect methods are very lengthy and complex. Moreover, Outlook Express is a discontinued email client.

So, we will suggest you to use third-party tools to import MBOX data into outlook. Professional tools help you to achieve a successful MBOX to PST conversion without any trouble and hassle.

Unable to deal with MBOX errors and issues

MBOX email client users often face errors and email inaccessibility issues. MBOX files can be corrupt too. Mostly these issues are caused by email client crashes, improper system shutdowns, hardware issues, and virus attacks.

Solution

The solution to these issues may vary depending on the email client you are using. Uninstallation and reinstallation of the email client is a recommended solution to many of these issues. Also, users can try to recover the MBOX data to some other formats like PST, EML, or MSG using third-party converters.

MBOX to PST conversion – an easy way to import MBOX emails to Outlook

MBOX is very flexible file format, but the problem with MBOX is that it is not supported by MS Outlook. If MBOX users want to access their email items in MS Outlook, they have to convert their MBOX files into PST files. Using efficient tools, even inaccessible MBOX files can be converted to PST. So, MBOX to PST conversion is a general solution to most of the issues faced by MBOX users. It helps them:

  • access MBOX emails in Outlook.
  • deal with MBOX inaccessibility issues.

Issues faced during MBOX to Outlook conversion

While selecting an MBOX to PST converter, users have to be very careful. Many tools may have shortcomings like:

  • Interface is not user friendly.
  • UNICODE characters are not supported.
  • Tool is sluggish.
  • Other Language Emails (other than English) are not supported.

Kernel for MBOX to PST

Kernel for MBOX to PST is the best third-party conversion tool you can have to access all your MBOX data in MS Outlook. This tool supports the migration of about 20 MBOX email clients to Outlook.

  • Performs multiple file migration
  • Supports 20 MBOX email clients with all their versions
  • Live preview facility to view all your emails before saving
  • Migrates emails of Thunderbird, Apple Mail, Entourage, Spicebird, etc.
  • Migrates without data loss, maintaining the data integrity.
  • Provides multiple file saving options—PST, Office 365, Exchange, etc.

Step-by-step guide for migrating Exchange Server 2010 to 2016 – Part 7

$
0
0

Migrate Exchange 2010 mailboxes to Exchange 2016

Instant Solution - Kernel Migrator for Exchange

Exchange/Office 365 migrations are quite easy with professional tools like Kernel Migrator for Exchange. This tool helps to manage mailbox and public folder migrations involving different Exchange versions and deployment types. Also, this tool helps with all tasks starting from the pre-migration analysis to the preparation of reports after the migration.

Migrate Exchange 2010 mailboxes to Exchange 2016

After configuring the Exchange 2016 services (see Part 6 of this Series), you can migrate Exchange 2010 mailboxes to Exchange 2016 from the Exchange admin center. If you find manual method difficult, you can opt for professional Exchange migration solutions too.

  1. Open Exchange admin center (EAC).
  2. Provide the credentials of the account used to install Exchange 2016 and sign in.

    Note: Provide username in Doman/username format
  3. In the Exchange admin center, go to recipients > migration. Here, click + (Add), and select Move to a different database from the dropdown list.
  4. In the new local mailbox move page, click + (Add) under the section Select the users that you want to move.
  5. In the new window Select Mailbox, select and add the mailboxes for migration, Finally, click add; click Ok.
  6. In the new local mailbox move page, the mailboxes get listed under Select the users that you want to move; click Next.
  7. Provide the target database name where you want to migrate mailboxes (under Target database); click Next.
  8. Select the user who is to receive notifications (by default, it is the current user), ensure that Automatically start the batch is selected, and select the required batch migration completion option. Finally, click New.
  9. To verify the status of migration and get the details, go again to recipients > migration, select the migration batch, and click View details.

Also, if you have public folders, you can migrate them also to Exchange 2016. However, we are skipping the procedure for now. However, professional Exchange migration solutions are best for public folder migration, considering the complexity of the manual process.

Summary

The EAC of Exchange 2016 helps to migrate mailboxes from Exchange 2010 to exchange 2016. Also, you can migrate public folders from Exchange 2010 to Exchange 2016 using manual methods. Also, you can use professional solutions for Exchange 2010 to Exchange 2016 migration (both mailboxes and public folders).


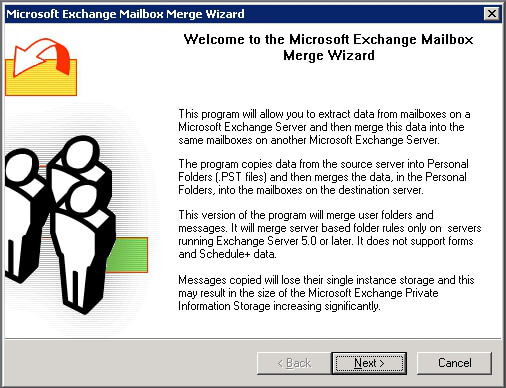
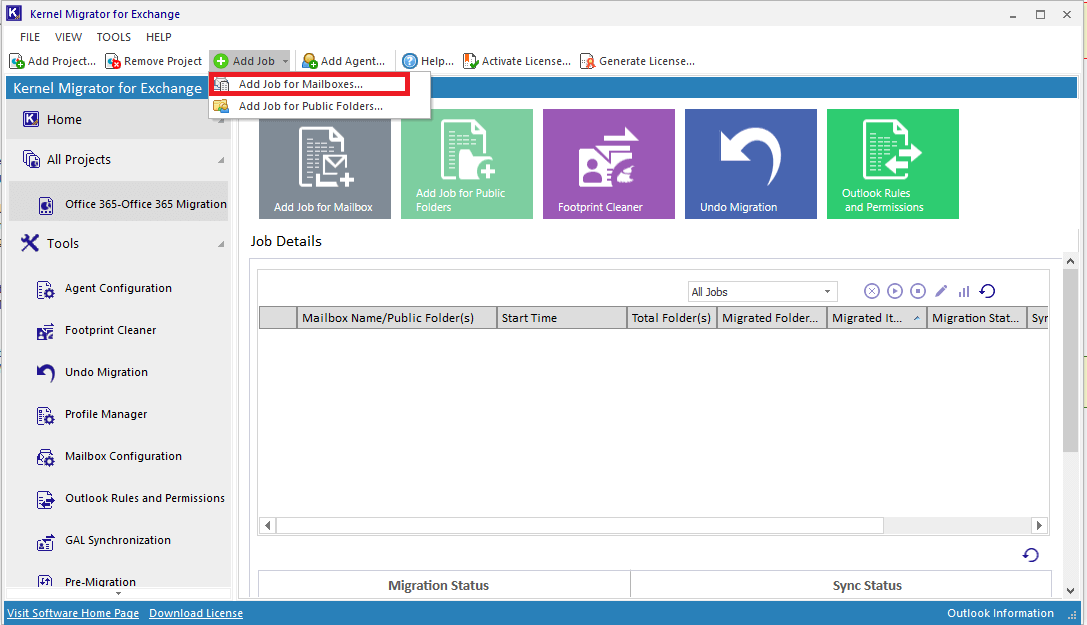
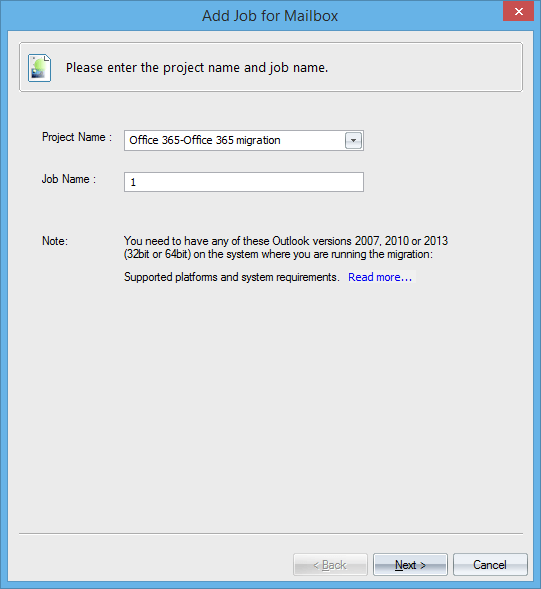
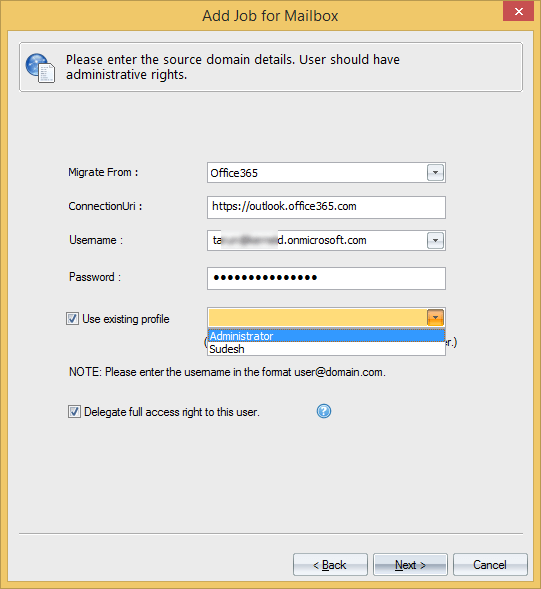
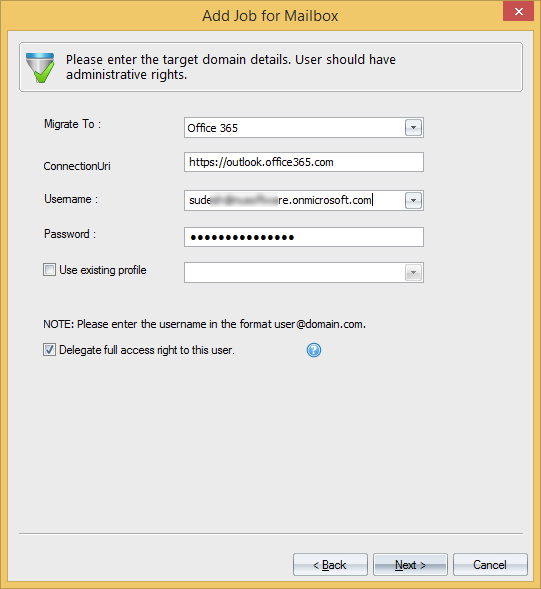
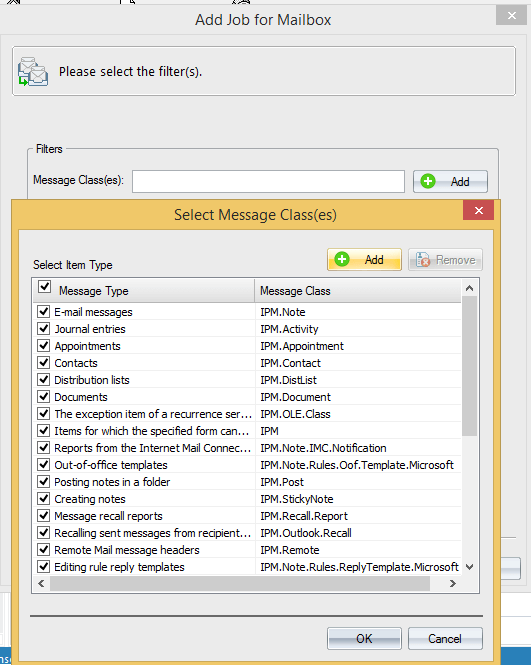
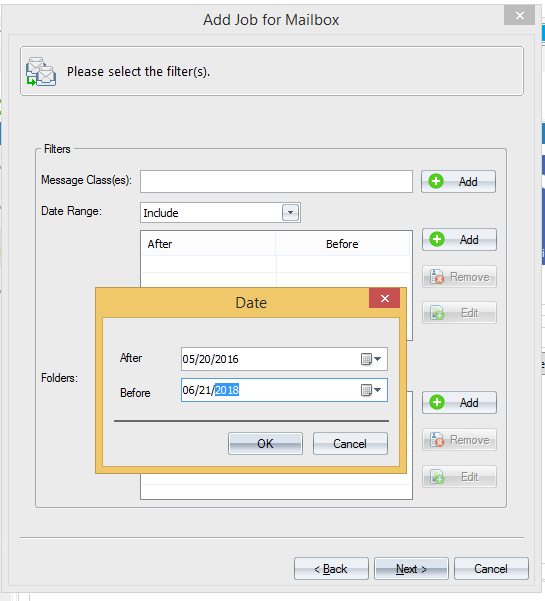
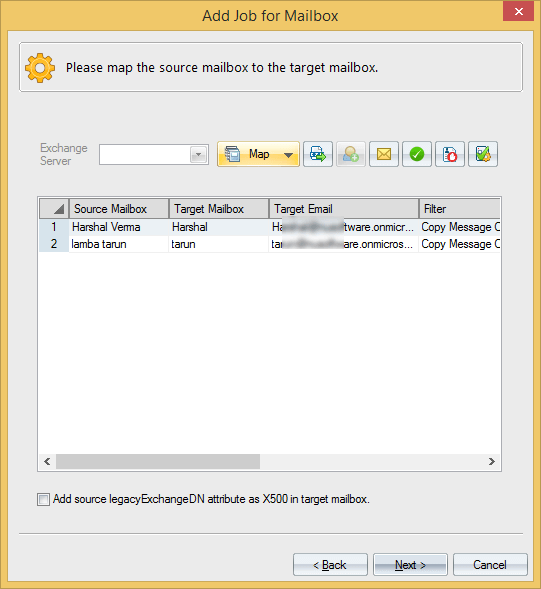
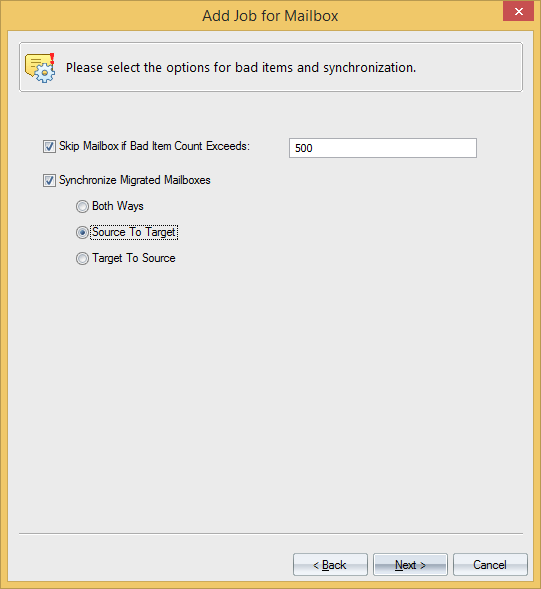
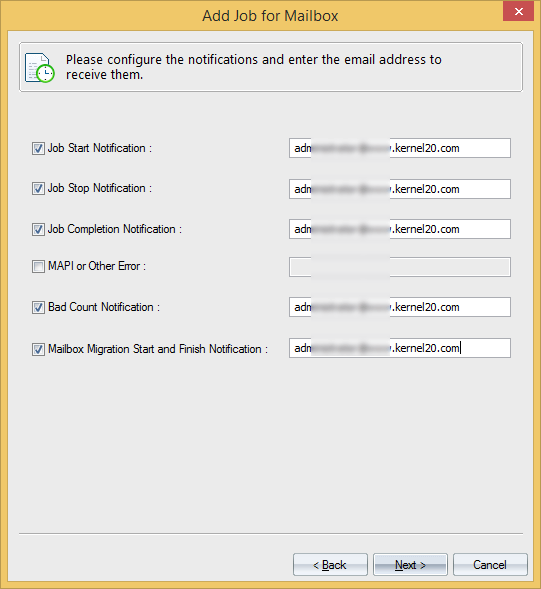
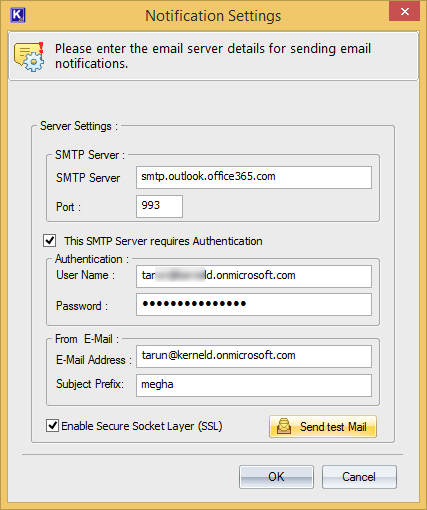
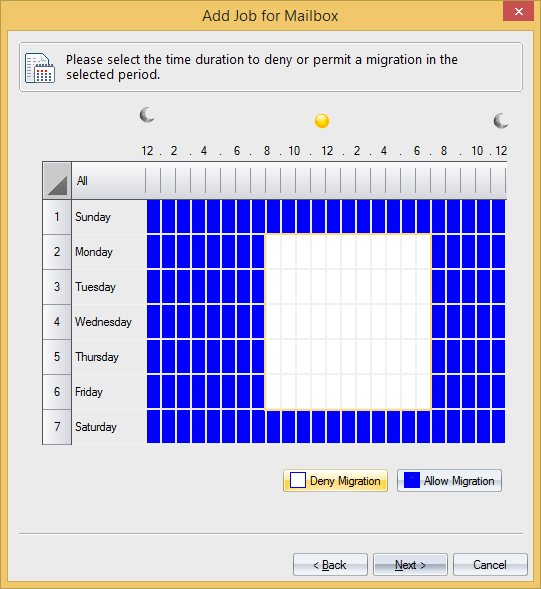
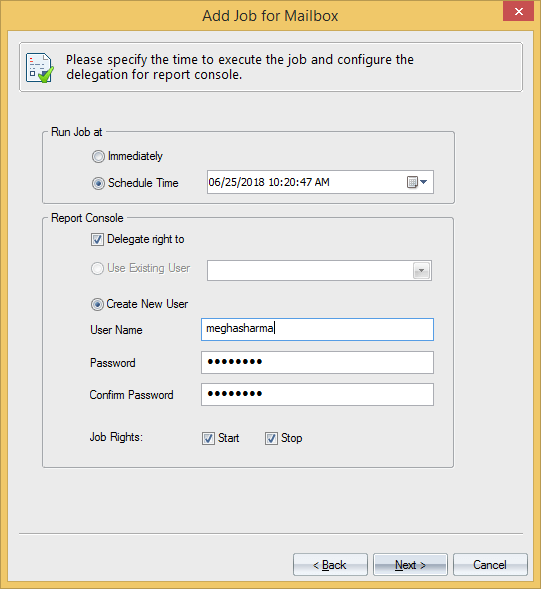
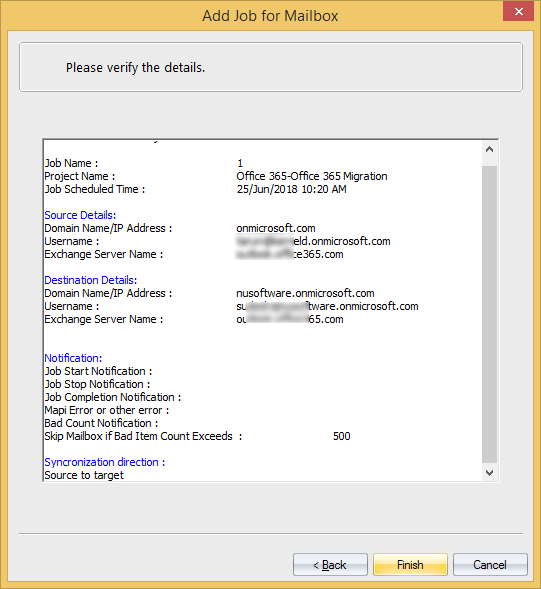
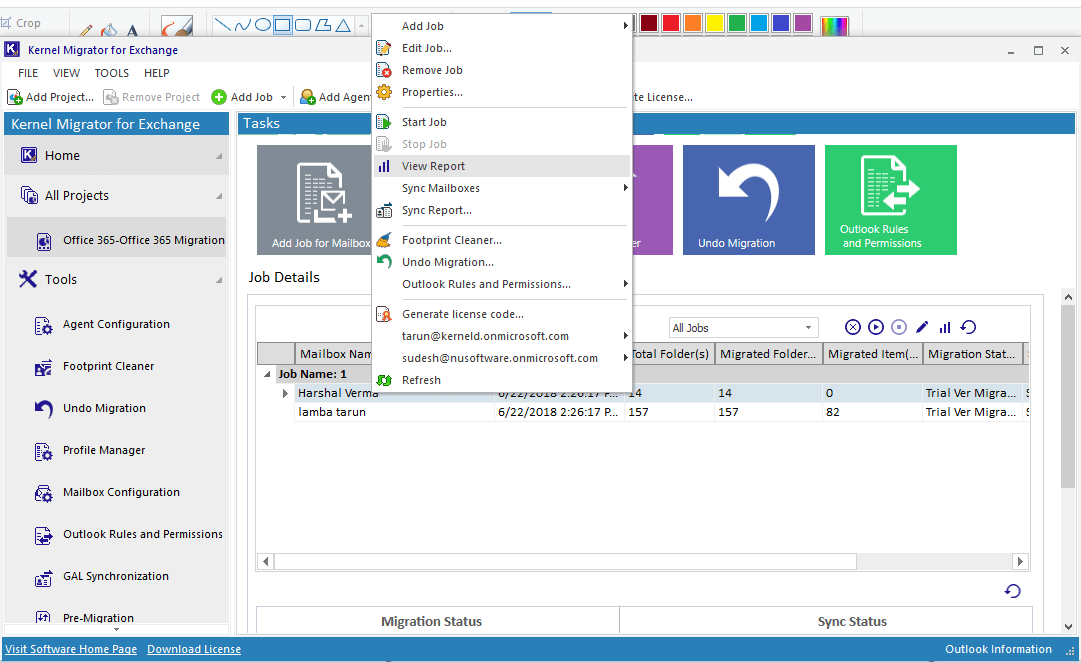
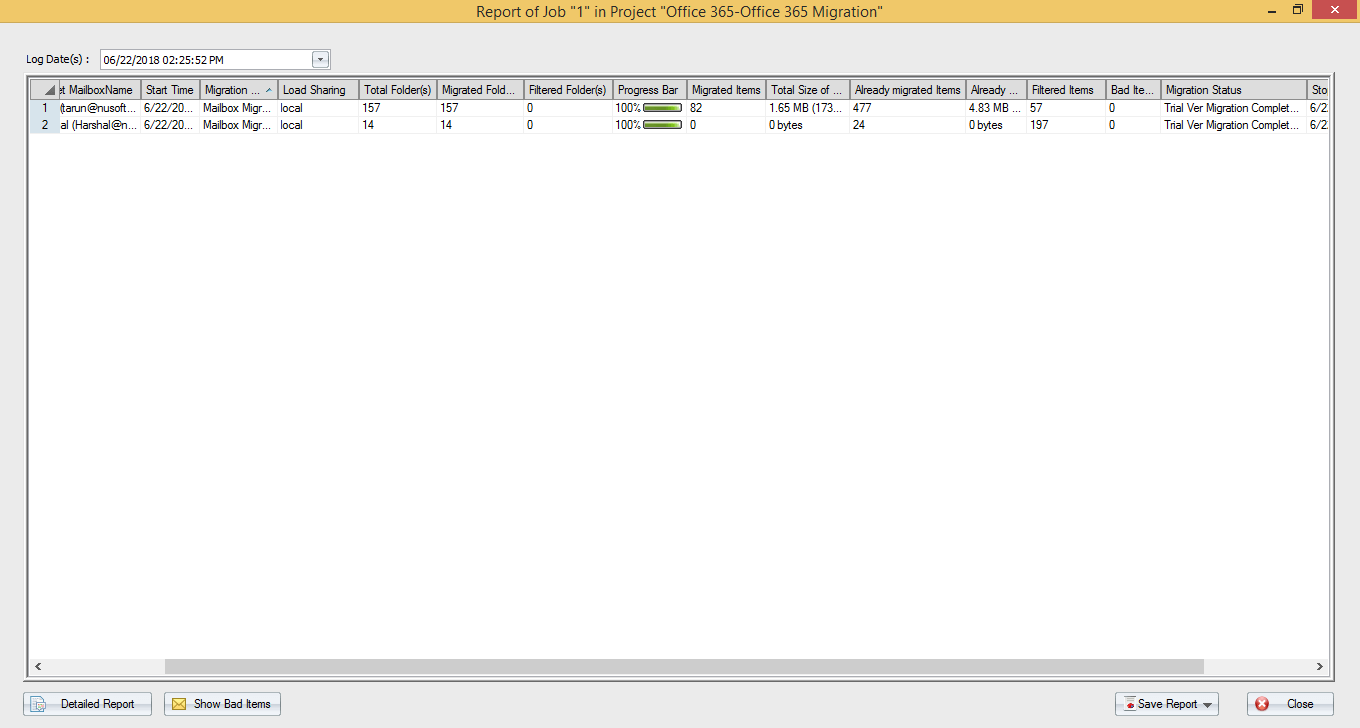
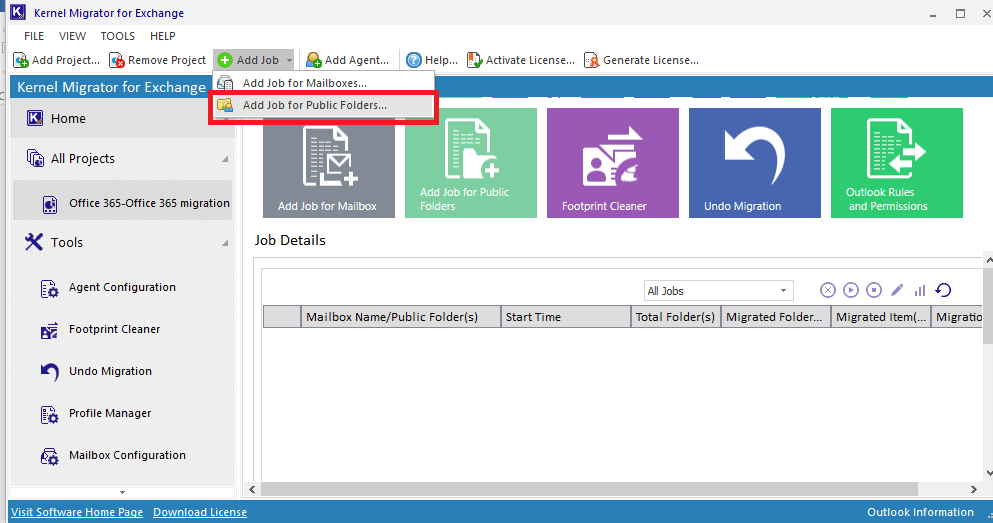
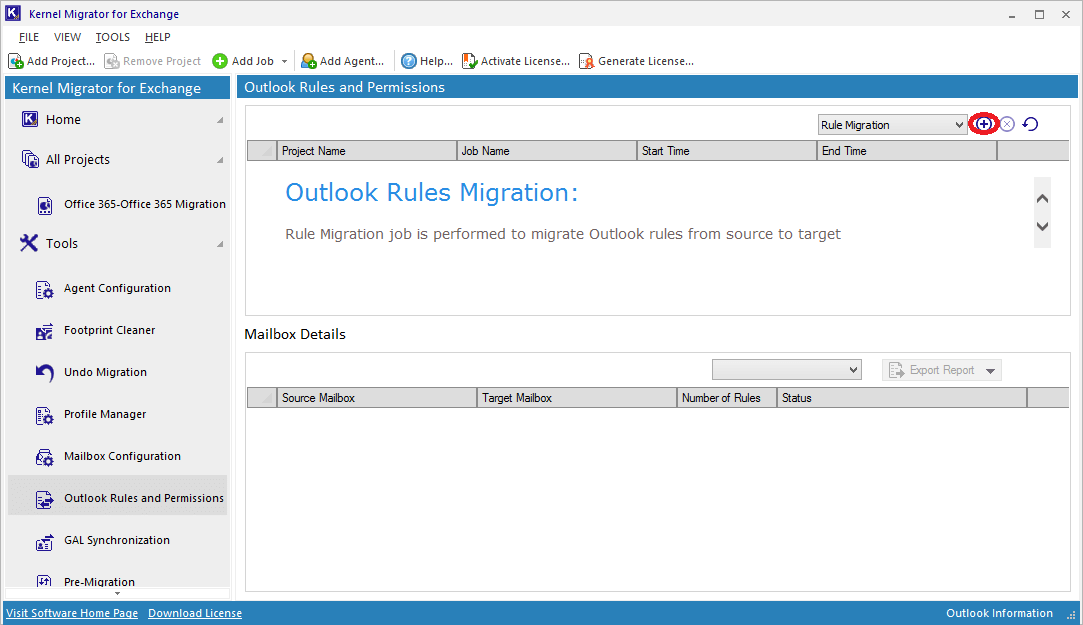
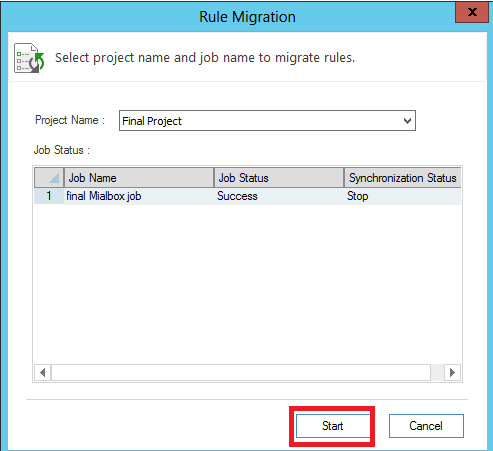
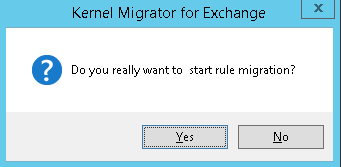
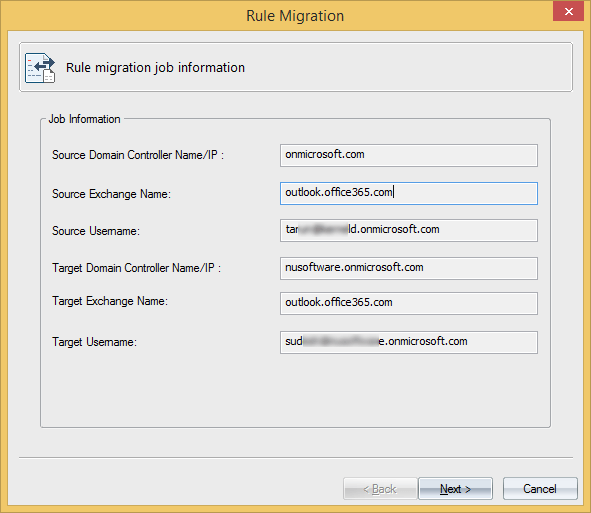
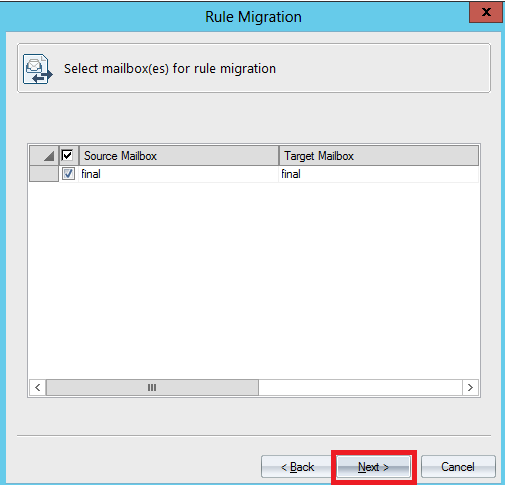
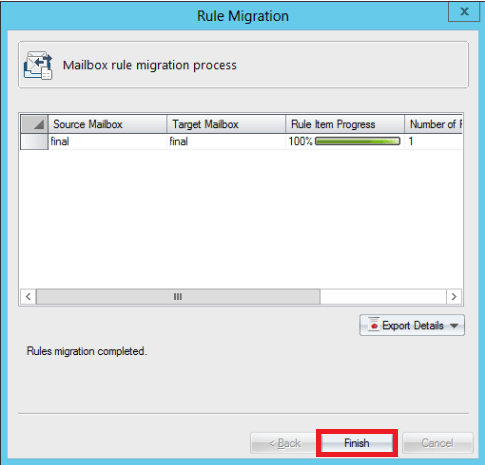
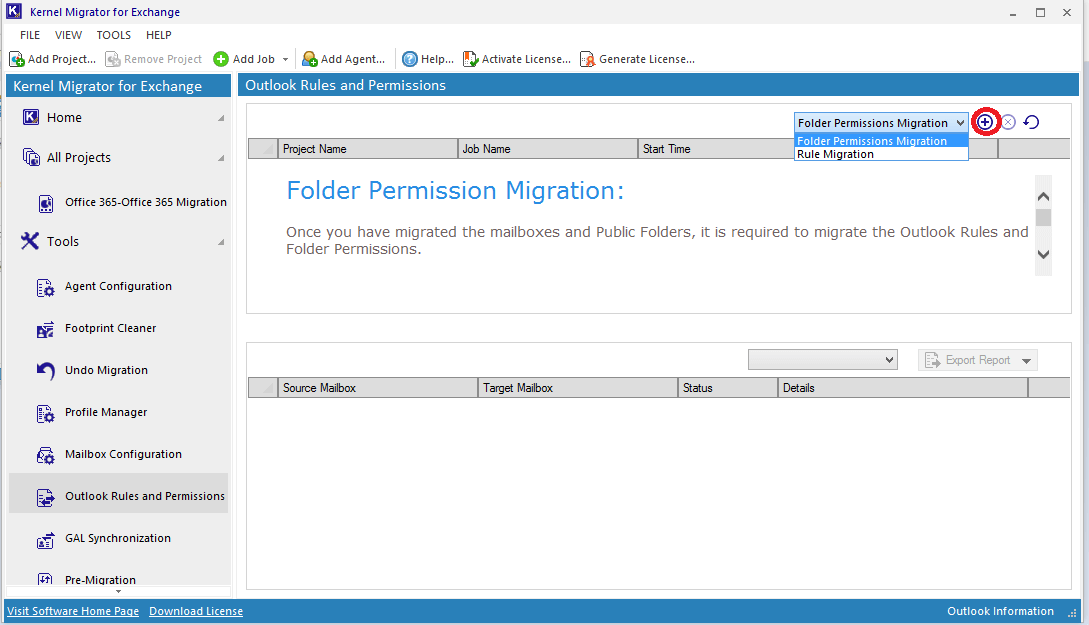
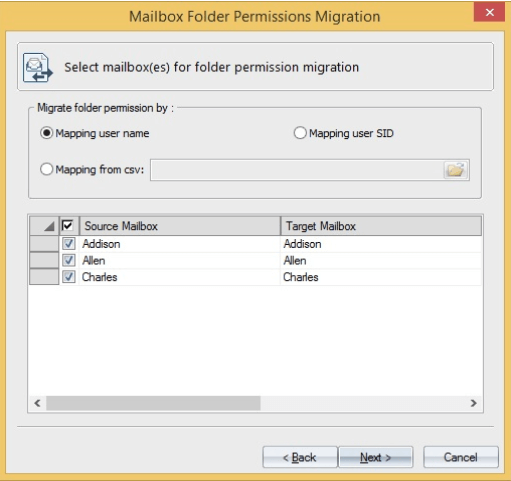
Instant Migration Tips : Migrating mailbox/public folder limits and permissions with Exchange Migration Tool

Do we need to re-assign limits and permissions to mailboxes and public folders after Exchange 2010 to Exchange migration? Not necessarily. Kernel Migrator for Exchange lets you migrate limits and permissions of mailboxes as well as public folders.

The post Step-by-step guide for migrating Exchange Server 2010 to 2016 – Part 7 appeared first on Kernel Data Recovery.

Top 10 Exchange Migration Checklists to Migrate from Exchange Server 2010 to Exchange 2013/2016

$
0
0

Exchange-to-Exchange migration can be challenging and time-consuming, especially when moving from an older Exchange version to a newer version – such as Exchange 2010 to 2013/2016 migration. It may get even challenging when the source and destination servers are stored in different forests. Therefore, you need to have a good start and spend some quality time in planning, preparation and deployment of the upgrade.

This article focuses on Exchange migration checklist that every Exchange Administrator must keep in consideration to ensure a successful migration. The checklist offers important information that can help you to better understand the migration scenario for Exchange 2010 to 2013/2016 migration.

Exchange Server migration can be categorized in three phases:

  • Planning – That involves the all the strategic part for successful deployment of the project.
  • Deployment – Establishing a co-existence between the source and destination Exchange servers.
  • Migration – Transitioning of mail flow, mailboxes, public folders etc. from Exchange 2010 to 2013.

Exchange Migration Checklist For Exchange 2013/2016 Migration

When you’ve planned to migrate to Exchange 2013 or Exchange 2016, then here’re the checklists of top suggestions to help the administrators overcome the migration woes.

  • Project Assessment – It’s obvious that without having a crisp overview of your migration project, you cannot gather the right resources or even evaluate the estimated time of the project release date. This is where you need to perform the project assessment to plan out every element of the project precisely. Below is the list of factors on which you can assess your project:
    • Your business requirements (recovery, migration needs etc.)
    • Amount of data that you want to retain
    • Amount of data (number of mailboxes) for the migration
    • Specify the type of data to migrate (emails, address book, appointments etc.)
    • Specify the deadline for completion (in weeks, or months?)

Use the above gathered information for planning and designing the migration infrastructure.

  • Verify the system requirements: Once you’re well acquainted with the project do’s and don’ts, the release dates and all; then it’s time to authenticate the system requirements. Grab all necessary details about hardware and software requirements, network speed, operating systems required for the execution of the project. Most importantly, don’t forget to ensure about the coexistence scenarios.
  • Clean up Active Directory: Another important checklist is to clean up your Active Directory, and eliminate all references to Exchange domains and other AD objects that are no longer authenticated. Otherwise, these objects would collide later and may become the reason for the migration failure. You can remove these objects from AD with ADSIEdit, but make sure you’ve already taken the backup.
  • Archiving Data: Before executing a real migration, archiving the data is important. This not only avoids the unnecessary migration of data to the newer Exchange Server, but also reduces the server bloat. For example, if you a 2 TB of data on your messaging system, then without archiving it would bloat up to 3-4 TB in size, because of the SIS factor (single instant storage), causing data replication in the newer version. You can simply eliminate it by archiving the data and only fractions of it would be injected to Exchange Server 2013/2016. Hence, eliminating risks of data loss and data files from being corrupted.
  • Ensure Good Health of Exchange Databases: The main reason why your Exchange database should be in good health, because you don’t want to be in any trouble or risk during the migration. Migrating the mailboxes and public folders is already a critical task, and you would never want to invite other troubles within your existing database. So, it’s essential to maintain a healthy database (use ESEUTIL utility whenever required) and take routinely backups to avoid any disruptions.
  • Plan for Server Roles: Exchange 2010 uses these five server roles.
    • Client access server (CAS)
    • Mailbox server
    • Unified messaging server
    • Hub transport server
    • Edge transport server

But in Exchange Server 2013, only two server roles are required – the mailbox server and CAS. So, it becomes mandatory to determine the current architecture and evaluate how this variation is going to affect the overall migration process. At the end, it will guide you to start developing your migration journey.

  • Evaluate the Impact on Hardware Resources: It is observed that Exchange 2013 preview release is more like to have strain on hardware resource than on the deployment of Exchange 2010. So, it also becomes essential to determine how Exchange 2013 will result on your current hardware resources.
  • Handling Public Folders: Public folder migration is tricky and in Exchange 2013 – you get to work with modern public folders. Migrating public folders content to SharePoint was still feasible, but with modern public folders, you’ve to be more cautious. But, you still have the chance to save them in legacy Public folders.
  • Develop Migration Roadmap: Migration of Exchange 2013 is enormously different from the previous versions. So, evaluate all the current Exchange Server setup for Exchange 2013 and understand how it is going to impact on your organization. Run it down multiple times to confidently develop the roadmap of a smooth and successful Exchange Migration.
  • Final Cut-over to Exchange 2016: Before making the final move to Exchange 2016, simply perform a final validation where collect all the data from your existing messaging system and inject to newer Exchange system (2016). When you’re finally convinced that all the Exchange components are functioning perfectly, then you can take the decision to go live on your Exchange 2016 platform.

However, don’t forget to implement the post migration tasks, once your migration job is completed to Exchange 2013/2016. This is done to validate that everything is running smoothly – such as your mail flow, mailboxes etc. after achieving the migration.

However, you can take an alternative path to escape the complex manual migration job using a simple and secured third-party Exchange migration tool – like Kernel Migrator for Exchange that allows smooth Exchange to exchange/Office 365 migration (to-and-from any version) in same domain and cross-domain environment. This tool takes care all the premigration checklists to ensure smooth, secured and successful Exchange migrations.


The post Top 10 Exchange Migration Checklists to Migrate from Exchange Server 2010 to Exchange 2013/2016 appeared first on Kernel Data Recovery.

Step by Step Guide to Convert EDB Files to PST in Different Exchange Versions – Part 1

$
0
0

This step-by-step guide will make you familiar with the manual methods to Convert Exchange database (EDB) files to Outlook PST file. It explains the different techniques for different Exchange Server versions in a very comprehensive manner.

Why do we need to export Exchange mailboxes to PST?

Before going to the procedures, let us understand why it becomes necessary to Convert Exchange mailboxes to PST.

  • Backup purposes– Sometimes it becomes essential to backup specific Exchange mailboxes (e.g., when an employee leaves the organization). Backing up user mailboxes to PST is a cost-effective option available for Exchange administrators.
  • Portability needs – User mailbox data, when saved in PST files, is portable. One can move data quickly to other locations through different storage devices.
  • Compliance requirements – For legal and compliance requirements, it becomes necessary to collect, save, and retain some specific data for a long time.

How to convert EDB to PST manually in different versions of Exchange?

We have discussed the various requirements for EDB to PST conversion. Now, let us focus on how to convert the EDB data to PST. Exchange database to Outlook PST conversion can be performed using different methods depending on the Exchange Server version. Here, we are going to discuss them in detail – the three manual methods to convert EDB mailboxes to PST file:

Convert EDB to PST using the ExMerge utility in Exchange Server 2003

ExMerge is a free application provided by Microsoft. It convert Exchange EDB files to PST and imports data from PST file to Exchange as well. The utility can convert multiple mailboxes. It prevents duplicity and provides brick-level backup.

Prerequisites for using ExMerge

Before starting the export procedure, the user must fulfill the following requirements:

Using ExMerge Application

After successful installation of the ExMerge application, follow the steps as under:
Step 1. Launch the ExMerge application. The welcome screen will appear like this. Click Next to start.

Step 2. In the opened Procedure selection dialogue box, select Extract or Import (Two-step procedure). Click Next to continue.

Step 3. In Two Step Procedure dialogue box, select Step 1: Extract data from an Exchange Server Mailbox to extract the mailbox data. Click Next to move further.

Step 4. Now provide the Exchange Server credentials from where data is to be extracted. Click Next to continue. Also, you can configure message selection criteria by clicking Options.

Note: In the Data Selection Criteria dialogue box, go to Import Procedure tab. Select Archive data to target store and click OK to continue.

Step 5. From the mailbox selection dialogue box, select the mailboxes you want to export. You can use the options Select All/Deselect All for easy selection. Click Next to move ahead in the process.

Step 6. In Target Directory dialogue box, provide the destination path. You can use the option Change Folder to change the default folder location. Click Next to start the process.

Step 7. The export progress is displayed by the utility. Once completed, click Finish to complete the process.

The EDB file data gets exported to PST file.

Drawbacks of ExMerge application

The ExMerge application can convert EDB mailboxes data to Outlook PST file but holds some risks and limitations.

  • Takes much time to export
  • Lengthy procedure
  • Chance of data loss
  • Fails to export data more than 2 GB
  • Works efficiently with earlier versions of Exchange only

Summary

The Microsoft ExMerge application can move EDB mailboxes to PST. It is indeed a free application, and so is attractive to the users. But satisfactory results are not guaranteed always. Also, it is time-consuming. Data loss possibilities and file-size limitation issues are also there.

The post Step by Step Guide to Convert EDB Files to PST in Different Exchange Versions – Part 1 appeared first on Kernel Data Recovery.

Step by Step Guide to Convert EDB Files to PST in Different Exchange Versions – Part 2

$
0
0

Convert EDB to PST using Exchange Management cmdlets in Exchange 2007 & later versions

In Exchange Server 2007 and later versions, administrators export Exchange mailboxes to PST using PowerShell cmdlets. However, the PowerShell cmdlets vary with the Exchange Server version. Here, we are going to discuss the EDB to PST conversion process in Exchange Server 2016 version, using the New-MailboxExportRequest cmdlet.

Prerequisites for Converting EDB mailboxes to PST

For converting Exchange mailboxes to PST, the user must meet the following requirements:

  • The user must have Mailbox Import Export Role assigned to him to perform the export. You can use Exchange Admin Center to assign permissions. To assign the required rights, the following cmdlet can be executed.
  • “New-ManagementRoleAssignment -Role “Mailbox Import Export” -User “”<user name or alias>”
  • The PST saving location must be a shared one.

Using Exchange Management Shell cmdlets to convert Exchange mailboxes to PST

convert the EDB mailboxes to PST in Exchange Server 2016, using the PowerShell cmdlet New-MailboxExportRequest. You can run the PowerShell cmdlets in the following syntax:

New-MailboxExportRequest -Mailbox -FilePath ” “<destination file path>”

Here, mailbox name will be the name of the mailbox which is to be exported and destination file path is the location of the PST file. For instance,

New-MailboxExportRequest -Mailbox abcd@www.kernel21.com -FilePath “\\NDRWEB76-PC2\PST Data\Kanishka_PST.pst”


Hence, your EDB mailbox gets saved to the specified PST file location.

Limitations with Exchange Management Shell command line tool

Using cmdlets, the tool exports EDB mailbox to PST file, but it has some flaws as well. Some of them are:

  • Good knowledge of the EMS cmdlets is required
  • Does not recover mailboxes from corrupt EDB file
  • Mailbox should be mounted on Exchange Server

Summary

To EDB to PST conversion using EMS cmdlets, users should be technically good. Although, the user can take a chance with small migration using this free method, it becomes complicated with multiple mailbox migration.

The post Step by Step Guide to Convert EDB Files to PST in Different Exchange Versions – Part 2 appeared first on Kernel Data Recovery.


Step by Step Guide to Convert EDB Files to PST in Different Exchange Versions – Part 3

$
0
0

After discussing the ExMerge application and PowerShell cmdlets methods to convert EDB to PST, we can say that these methods are useful but lengthy and complicated. To overcome these limitations, we are going to discuss another manual way to export EDB to PST, i.e. exporting via Exchange Admin Center. This manual method is useful for exporting EDB data from latest versions of Exchange to PST. It is the simplest manual way to export the Exchange mailboxes to the defined destination.

Prerequisites for EDB to PST conversion

Before starting the manual EDB to PST export process, the user must consider the following requirements:

  • The user should create a shared folder to export the mailbox data
  • Should assign Export Permission to the Mailbox performing the export. This can be done by–
    1. Open EAC and click Permissions> admin roles. Open Recipient Management by clicking it. In Role, select Add.
    2. In the Select a Role page, click Mailbox Import Export. Then select Add, and click OK

Convert Exchange mailboxes to PST using Exchange Admin Center

To convert EDB mailboxes from Exchange Server 2016, follow the steps:
Step 1. Open Exchange Admin Center, go to recipients and then select mailboxes. You will get a complete list of mailboxes.

Step 2. Right-click the mailbox you want to export and select the Export to a PST file option.

Step 3. In Export to a .pst file dialogue box, Browse and select the required mailbox. Select the desired option and click Next.

Step 4. Provide the destination where data needs to be saved. Click Next to continue.

Step 5. Select the given checkbox and provide a mailbox name to receive the email notification.

Step 6. Now, click the Finish button.

Your mailbox will get exported to the defined destination.

Note: You will get a confirmation message in the specified PST mailbox, once the export process is completed.

Limitations in Export via EAC

This export method is not error-free and has some drawbacks:

  • Requires some technical knowledge
  • Does not recover corrupt mailbox data
  • Cannot be done with earlier Exchange versions
  • Risk of data loss

Summary

Using Exchange Admin Center is the simplest manual method for converting EDB to PST. This method is user-friendly and straightforward, provided the user performing the export has the necessary permissions.

The post Step by Step Guide to Convert EDB Files to PST in Different Exchange Versions – Part 3 appeared first on Kernel Data Recovery.

Unable to Access OST in MS Outlook 2016

$
0
0

Microsoft Outlook displayed an error “OST file cannot be accessed” which means that we are unable to open OST file in Outlook 2016. I saw these kinds of error with so many people, so today I will help in resolving this error with manual and automated process both.

This happens with many users, and I saw many people who are suffering from the same issue that they are unable to access their OST file in Outlook 2016. I also experienced the same situation too, but I recovered it and successfully accessed my OST files. After reading the issues of users, I should share this that how quickly you can resolve this issue. As everyone knows that OST files are the copy of original data that stores on Exchange server. When we create an OST file, it makes a copy of entire user mailbox and stores it to system hard disk. If you created any change in OST that will reflect on Exchange Once you are connected with it. So, you can access OST files without any internet connection. However, apart from that if you are unable to access OST, then MS Outlook must be corrupted.

Benefits of using OST file

OST files are beneficial in many ways some of the benefits of OST files are stated as below:

  • Access mailbox data without internet connectivity or low internet speed.
  • Access user mailbox without establishing a connection with Exchange.
  • OST can be used as a backup file if Exchange gets damaged, restores data from OST.
  • To recover data from OST files, you have to convert OST file to PST.
  • Sometimes, some emails are essential to restoring, OST files used in this case.

Disadvantages of using OST files

As OST files have some advantages like this OST files has some drawbacks also which are stated as follows:

  • OST files are only used for the profile which it belongs to.
  • If profile gets damaged or deleted, you cannot use OST file.
  • To recover data from OST file, OST conversion tool is required.

Manual Approach to make OST file accessible

Before using any manual approach, please create a backup of your OST file. Because there may be chances of losing data while fixing issues. There is a way to fix errors of Outlook which are stated as below:

Disabled Outlook Cached Mode

Before applying this process, you have to close the End the task in Task Manager

  1. Close MS Outlook and open Control Panel.
  2. In Control Panel click on Select Mail and then choose Email Account.
  3. Now, choose Email Address which displays OST error and then select Change.
  4. After that unchecked “Cached Exchange Mode” then click on Next and Finish the process.

Drawbacks of Manual Approach

  • It is very lengthy and time-consuming.
  • Requires much technical expertise.
  • It is not reliable for non- technical users.
  • Does not ensure data integrity & security.
  • Email hierarchy and properties may get altered.

Automated Tool

Kernel for OST Recovery

The software is programmed with an advanced algorithm that repairs harshly corrupted OST files and convert them into PST so, that you can easily access them in MS Outlook. OST Recovery tool retrieves user mailboxes from damaged OST and migrates it to PST. Moreover, if your OST is created in any version of MS Outlook, this tool supports them all.

The post Unable to Access OST in MS Outlook 2016 appeared first on Kernel Data Recovery.

5 Ways Your Company can Benefit From Office 365 Migration

$
0
0

Office 365 evolution is a very important one in today’s digital environment. Accessing and working on the saved data online is a virtue for the business world. Its advent in the year 2011 by Microsoft has proved a greatest invention in the software world till date. The provided cloud environment secures all the data and tasks online without thinking much about the storage space. It supports all the existing Microsoft tools (Word, PowerPoint, etc.), SharePoint, OneDrive and their versions online. But the users are still confused to move to the cloud based Office 365 or not. To avoid this confusion, we are going to mention some productive advantages of the Office 365 web-based application. Let us see each profit one by one in detail.

Power of accessibility

With Office 365, there comes an utmost power to access the data saved online as long as you have internet connection. It allows user to access the emails, documents, Microsoft Office applications (Word, Excel and PowerPoint) online thus making data portable. This feature of Office 365 application is quite beneficial for the users who use to move from location to location for their work. The user of Office 365 has the power to access the data from anywhere at any time without worrying for any infrastructure and requirements. The organization can access the data with single (Personal) or multiple users (Home) Office plans.

Cost savior

Besides saving data online and making it accessible anywhere, the Office 365 is advantageous as it saves the unnecessary cost. Using this application, you will have automatic upgrades for each version of the integrated Microsoft applications. Unlike Exchange application which goes offline & requires patching while updating any new version in the system, Office 365 enables you to access/work on mails data while Microsoft performs automatic upgradation. Thus, this automated update of the new versions of the applications saves IT management costs and time for an organization effectively.

Protects data like no other app

Office 365, as we know has a cloud based environment that saves all the data in an online cloud. This data is secured online with minimum risk of losing it anyway. The Microsoft has provided Office 365 application several in-built security measures to protect valuable data online. It provides facility to encrypt emails (access to defined recipients) and mobile device management to protect organization confidential data. Advanced Threat Analytics in which employees are pre-informed for malicious data to be entered and email will be still received with the error and its cause. Thus, your organization benefits a secure and reliable environment for data through Office 365.

Single log-in access

The users can access multiple applications like Microsoft Office applications, OneDrive, SharePoint, documents, emails, etc. using single login credentials (User name and Password). Thus, reducing the number of passwords to keep in diary. For all the applications to access at a single platform (Office 365), users need to provide username and password set for Office account. Doing this, you are able to work on any application integrated with Office account. No, separate log in is required for using other application. This exclusive feature reduces complexity to use applications and saves precious time too.

Easy collaboration

Another benefit from the numerous benefits of Office 365, is that the users can makes changes to or edit any document like Word, Spreadsheet, PDFs easily. All these changes can be made on the same version and not looking for separate versions for separate application. The users can also send direct links in place of attachments to share your data and can edit in a single copy for the single version. This makes the digital working easy and let the organization work at their comfort.
The above-mentioned benefits of Office 365 migration are not the only benefits. There are more in the lot. But to understand its value and pros, these features work well for the organization looking for migration.

Final conclusion

Migration from other desktop client applications to Office 365 web-based cloud application is a wise choice anyhow. For organizations looking forward to environment for data that is secured, easily accessible, trouble-free and customer-friendly, migration to Office is undoubtedly a nice option! Rest is the decision of intelligent users of the organization to migrate to Office 365 or not.

The post 5 Ways Your Company can Benefit From Office 365 Migration appeared first on Kernel Data Recovery.

Recover accidentally deleted Public Folder in Exchange 2010

$
0
0

It is possible that you accidentally delete a public folder and want to recover it later. The article is about recovering accidentally deleted public folders from Exchange 2010. If you’re going to do the recovery manually, you can use Exchange Management Console or ExFolders.

Recover Exchange 2010 Public Folders

Option 1Using Exchange Management Console
Let us see the procedure to recover Exchange 2010 public folders.

Important – Start with restoring Exchange database to a different location from Exchange backup using Windows Server Backup tool.

  1. Initially, open the Exchange Management Console. Go to Microsoft Exchange option, click Server Configuration and select Mailbox.
  2. Select the Exchange Server name from the server list.
  3. Then select the Public Folder Database name that needs to be restored.
  4. Now dismount the database selecting Dismount Database from right-click menu.
  5. After this, select Properties option from the right-click menu.
  6. Select the checkbox at the bottom saying, “This database can be overwritten by a restore.” Then, click Apply.

Restore the Public Folder Database

To restore the Public folder database, replace the restored public folder to the dismounted location as:

  1. Copy the restored Public Folder database to the location where the Exchange public folder database is restored (its location is generally in C:\Program Files\Microsoft \Exchange Server\Mailbox\).
  2. Now, rename the old database as per your choice and then paste the restored Public Folder database. (Important: the pasted Public folder database name must be exactly same to the earlier present database.)
  3. Open Exchange Management Console again and then select the option Remount to remount the database once again.

Option 2 – Using ExFolders in Exchange 2010 for recovery
ExFolders has the advantage that it does not require any database backups for recovery. Now, let us see how it helps in recovering an accidentally deleted public folder database.

  1. Download ExFolders tool for Exchange Server 2010.
    For Exchange Server SP1 and later, download using this link: h https://gallery.technet.microsoft.com/office/Exchange-2010-SP1-ExFolders-e6bfd405
    For Exchange Server 2010, download using this link:http://gallery.technet.microsoft.com/Exchange-2010-RTM-ExFolders-c76c3649
  2. Now run ExFolders from Exchange 2010 (you must store ExFolders.exe in the Exchange bin folder).
  3. Open ExFolders application. From File menu, click Connect. In the Connect page, select Public Folders option and then click Global catalog.
  4. Now in Public Folder tree, go to the top-level folder. Right-click on it and select Show deleted subfolders option. Doing this will make deleted folder (in Red characters) to appear.
  5. Click the Folder that reappear in Red and click Recover Folder option. Within a few seconds, you can access your deleted Public Folder in your Outlook.

Thus, using ExFolders tool, you have recovered your mistakenly deleted Public folders in Exchange 2010.

An easier option for Exchange 2010 public folder recovery
Exchange 2010 public folder recovery is easier with a professional tool. So, you can try Kernel for Exchange Server. This recovery tool offers complete Exchange recovery of Exchange public folders. The users just need the EDB file of the Exchange Server and the Exchange environment to which it is to be exported. It makes EDB recovery a quite simple task for Exchange administrators.

Summary
In Exchange 2010, public folder recovery is a complex task. However, it can be simplified with the use of professional tools like Kernel for Exchange Server.

The post Recover accidentally deleted Public Folder in Exchange 2010 appeared first on Kernel Data Recovery.

3 Ways to Fix “Exchange is Currently in Recovery Mode” Error

$
0
0

Cached Exchange Mode is one of the best features that Exchange/Outlook offers to its users. It allows users to work in offline mode. With cached Exchange mode, Outlook creates a copy of OST data on the local machine in OST file format which stores all the items that are already on the Exchange Server. The cached Exchange Mode facilitates offline working.

However, sometimes users face an error “Exchange is currently in recovery mode” error while synchronizing the OST file with Exchange Server.

Possible Reasons for the Error “Exchange is Currently in Recovery Mode”

There are many possible reasons due to which the “Exchange is currently in recovery mode” error occurs. Some of the main reasons are;

  • When the cached copy of mailbox in Outlook is different than the one in MS Exchange.
  • When users try to reset the Exchange, mailbox keeping the cached Exchange mode enabled, a new OST file is created by MS Outlook and retains the old offline OST data on the local system.
  • When the mailbox is migrated to another version of Exchange.
  • A slow and poor network connection between the client and the server.
  • Problem with DNS configuration as well as DNS settings.

How to Fix This Error?

There are generally three different methods to resolve this error. Here we are mentioning all the three ways that can fix this error.

  1. Disabling and Enabling the Cached Exchange Mode
    The first and the simplest method to solve this error is to disable and enable the Cached Exchange Mode. First, users have to disable the cached mode and delete the old OST file, and then restart the MS Outlook and enable the cached exchange mode. To understand better, follow these steps;
    • Open Outlook and go to “File” and choose “Account Settings.”
    • Now, select the mail account and click on “Change” option. A window will appear on your screen like this;
    • Disable the “Use cached exchange mode” from here
    • Now, delete the offline OST file from the mailbox.
    • Go to Control Panel, choose the Mail tab and click on profiles, and delete the existing profile.
    • Now restart Outlook and create a new profile.
  2. Creating a New OST File
    When you change Exchange Server, then you’ll have to create a new OST file because the existing OST file might not match with the new Exchange Server properly. Follow these steps to create a new OST file.
    • In the Control Panel, click the “Mail” option.
    • Now, select “Show Profiles.” A window will open like this:
    • Click the “Add” button to add a new profile. Give a name to the profile and click “OK.”
      Note: Do not keep MS Outlook open while performing these steps.

Kernel for OST to PST Converter

If you want to recover unsaved OST data from your old OST files, you need to convert OST files to PST using a third-party solution. Then Kernel for OST to PST converter is the best option. This OST Recovery tool can recover any corrupted OST file, and also provide the option to convert it into a PST file. Some of the main features of this tool are:

  • Preview all the items of the file before saving it.
  • Convert OST files to Outlook PST, & MBOX formats.
  • Exports OST data to live Exchange & Office 365.
  • Restores emails to Gmail/Outlook accounts.
    To convert an OST file with Kernel OST to PST converter, follow these simple steps;
    • Download the tool from Kernel OST to PST and install on your system.
    • After the installation, launch the software, and a window will appear on your screen. Select the file that you want to convert and click “Next.”
    • It will take a few seconds to complete the scanning process. Once the scanning of the file is complete, you’ll be able to see all the mailbox items in the left pane of the software. Select any item from the folders for its preview like this;
    • Now, from right pane of the tool, you can select the required saving option and save this file in the desired format, such as PST, MSG, EML or Office 365.

With the help of this tool, you can quickly recover and convert any OST to PST file or directly migrate it to Office 365 or Live Exchange Server.

Final Words

Small errors can often create a big problem, especially when you are working on Exchange Server or Outlook. And with “Exchange Server is currently in recovery mode” error, it becomes very difficult to access offline OST file. So, consider the above three methods to get rid of this type of errors.

The post 3 Ways to Fix “Exchange is Currently in Recovery Mode” Error appeared first on Kernel Data Recovery.

Why do we need to avoid manual MBOX to PST conversion?

$
0
0

MBOX files conversion is not going to be an easy process if you are looking for manual methods. There are many reasons to avoid manual method for MBOX to PST migration.

Reasons to avoid the Manual Techniques

  1. Complicated process:
    Manual techniques are very complicated, and so users may get confused about the steps.
  2. Time-consuming:
    It consumes much time than the automated techniques.
  3. Unorganized data:
    Once the data is successfully migrated to PST with manual techniques, the user will find that data is not in an organized form. Manual approaches may affect the folder hierarchy if not done correctly.
  4. No shortcuts:
    The entire manual technique is quite lengthy. So, when you are using it, you cannot stop it in the middle. And there are no shortcuts to finish it fast.
  5. Data loss:
    No manual process guarantees data security and integrity. So you may lose data.
  6. Not suitable for unskilled users
    A manual approach is tough to understand, lengthy and complicated. So, it is not suitable for non-technical users.

Reasons to use Automated Solution

Kernel has a very amazing MBOX to PST Converter tool for converting MBOX files to PST. Below are the reasons to use automated technique, i.e., Kernel for MBOX to PST Converter.

Top 6 reasons to use Automated Technique

  1. Quick and easy conversion
    Kernel for MBOX to PST is an easy and quick conversion tool. It does not take too much time to convert even large MBOX files to PST.
  2. Export multiple files to PST
    This utility allows you to convert single as well as multiple MBOX files to PST files. You can add a single file or an entire MBOX folder at the time of conversion.
  3. Live data preview
    This tool allows its users to see a preliminary view of the entire MBOX file before saving it to PST.
  4. Support 20+ MBOX clients
    This tool allows you to migrate MBOX files of more than more than 20 email clients to PST file.
  5. Split your MBOX data in PST
    With this tool, you can also save your MBOX files in multiple PST files with its PST split PST feature.
  6. Software compatibility
    Kernel for MBOX to PST is 100% compatible with all the versions of MS Outlook and Windows OS.

Final verdict
Converting MBOX files to PST with a third-party tool is much secure and reliable than trying a manual method. Kernel for MBOX to PST has many brilliant features and is easy to use even for non-technical users.

The post Why do we need to avoid manual MBOX to PST conversion? appeared first on Kernel Data Recovery.

Step by Step Guide for Migrating Office 365 to Office 365 Tenant Part-1

$
0
0

This guide is drafted to make the users knowledgeable about the simple Office 365-to-Office 365 migration with their own Kernel Migrator for Exchange ver 18.3. It includes all the required steps and added provisions in easy words in detail for a quick and successful migration.

As we know, businesses are continuously growing by adopting Office 365 as data storage client. The experts are fascinated to the newly introduced features in each new version of Office 365. As a result, they wish to migrate data between Office 365 tenants.

Manual way to perform this type of migration is currently unavailable. So, we will use an always ready-to-perform Kernel Migrator for Exchange tool for Office 365 to Office 365 migration.


Prerequisites – Office 365 to Office 365 migration

Before starting or going to Office 365 to Office 365 (different account), the users must have the following requirements fulfilled.

  • Any of the Microsoft Outlook version – Outlook 2007, Outlook 2010 and Outlook 2013 must be installed in the system on which tool will be used
  • Users should be the Global Administrator
  • User should have right on source or target or both Office 365 mailboxes as per migration requirements.
  • User should be a delegate with Full Access permission over all the mailboxes you want to access in Office 365

Perform migration between your Office 365 tenants in easy way

After discussing user’s need for migration, it is the time to understand the method of migration used by Kernel Migrator for Exchange. There are steps to migration with a definite function which needs to be followed for successful migration. We are going to discuss each step required for migration in detail –

Pre-migration Analysis and Settings

Let us start with the Pre-migration analysis function which is optional but useful for estimating the almost accurate time required for migration.

Pre-Migration Analysis for Office 365

Perform the steps one after another for pre-migration analysis.

  1. Start the software application and select the option Pre-migration on the bottom-right of the welcome screen.
  2. Click the (+) button to add a pre-migration job.
  3. It opens a dialogue box Add pre-migration job. Provide the required details Job For, Job Type including source Office 365 Username and Password. You can also use existing outlook profile for migration as well, provide your network speed and number of agents for load sharing (if want to assign). After all entries, click Next to continue.

  4. Here, select the mailboxes you wish to migrate. You can find specific mailboxes by entering specific keywords in Mailbox Name, Email Address and Load Agent search filters. Make selection and click Next.
  5. In this page, you can set filters on Message Classes, Date range and Folders criteria.

    You can add and remove the message classes for your mailbox items.

    You can include or exclude a specific date range for the mailboxes filtering.

    Similarly, you can include or exclude specific folders of mailboxes. Click Next.

  6. You get the summary report in this step. Revise it and click Finish accordingly.
  7. In the Pre-migration page, you get information about Total Items, Total Folders, Total Size, Approximate Time and Status of mailboxes for migration.

Note: The software provides facility to migrate public folders’ mailboxes (individually) of one Office 365 account to another also. So, you can have a pre-migration analysis for this migration as well in the similar way. (Just select public folders in place of mailboxes).

Advanced Settings for Job

Users can apply settings for their jobs like – Report Console Settings, Notification Settings and Log Settings. Let us discuss each one-by-one.

Report Console Settings

Through this setting option, you can access Report console with your provided login credentials for viewing details of the migration jobs created by the software.

Follow the steps to apply the settings for Report Console.

  1. At the home screen page of the tool, go to Tools>Report Console Settings.
  2. Click Add option to Add New User.
  3. Now, provide the asked details like User name, Password and Job Rights (Start and Stop means report for start and finish of the job). Click OK.

Hence, you can view these settings when you open Report Console to view your migration job details post migration.

Notification Settings

With this Settings option, you can configure an email server in the tool through which email notifications alerts would be received.

To do this, perform the given steps.

  1. At the home screen, go to Tools>Notification Settings.
  2. Provide the details needed for Server Settings – Username and Password for authentication. You also need to provide Email address of the sender, email-subject prefix and check box to enable SSL (if needed).

You can verify the email server configuration by clicking Send Test Mail option.

Log Settings

This settings option allows you to either enable or disable logging of mailbox, public folders configuration and synchronization jobs.

Note: Disabling the mailbox configuration and synchronization jobs helps in avoiding large consumption of storage space by files.

By simply clicking on the option would enable or disable the logging of job. Checkmark On means logging is enabled while checkmark absence means logging is disabled.

The post Step by Step Guide for Migrating Office 365 to Office 365 Tenant Part-1 appeared first on Kernel Data Recovery.


Step by Step Guide for Migrating Office 365 to Office 365 Tenant Part-2

$
0
0

Migrating Mailboxes and Public Folders

In this part of the guide for Office 365 to Office 365 migration, users are introduced with the essential steps required for mailboxes and public folders migration. Along with that extra amenities like filters, job scheduling, etc. are also mentioned in the guide.


Adding Project

The user is required to add a new project to manage all migration jobs under it for a single migration. Add a new Project like this.

  1. On the home screen, click Add Project from the toolbar.
  2. Now, provide a project name and click OK.
  3. Hence, a project is created by provided name and appears on left panel of the screen.

Adding Mailbox Migration Job

Under the project created, you can add mailbox migration jobs to migrate user mailboxes, archive mailboxes, etc. according to supported type of migrations.

Adding Source

Create the mailbox migration job with following steps.

  1. Select the project created and click Add Job for Mailboxes from the tool bar.
  2. Provide a Project Name and Job Name. Then, click Next.
  3. Enter the required details (login credentials) and select desired options. Click Next to add.
  4. Select your choice of mailboxes for migration and click Next.

Adding Target

  1. Now, select and add the target for the mailboxes migration. Add required details and then click Next.
  2. Apply Message Classes, Date Range and Folders filters (as in Pre-migration Analysis) according to your requirements. Make selections and click Next.

Mapping Source and Target Mailboxes

Now, map Source mailboxes to Target mailboxes. You can Map Mailboxes Automatically, Map Single Mailbox or Map Using CSV. Click Next to continue.

Managing Bad Items and Synchronization

In the next step you can manage Bad Items and Synchronization by selecting option Skip Mailbox if Bad count exceeds and entering the value.

Also, you can synchronize the source and target mailboxes Both Ways, Source to Target and Target to Source. After selections, click Next to move further.

Job Notification Settings

You can choose the migration events for which you want to receive notifications. Enter the email address through which you want to receive the notifications. Click Next.

If email server settings are not configured before, you need to configure it now by adding required details. Then, click OK.

Allotting Hours for Migration

In the next page, you hold the provision of denying and allowing hours for migration according to your choice. Select the cells and click the required button either Allow migration or Deny migration.

Scheduling Migration Job

You can start the job immediately or schedule it by entering date and time. The migration job will start at the specified time. Here, you can provide Report Console settings to access the migration job report with your set credentials. Select your settings and click Next.

Note: White spaces are not allowed in Username.

Migration Summary

In the last page, you will see the Migration report summary asking for verifying details. Check and click Finish.

The migration will start automatically if set to Migrate Immediately or at the scheduled time.

Migration Successful

Once the migration is successfully completed, the screen will be displayed like this.

You can view the report by right clicking on the mailbox folder and selecting View Report option.

The migration report will be displayed like this..

You can save this report to HTML or PDF format within Save Report option. Also, two options to view Detailed report for selected mailbox and viewing Bad items at the bottom bar – Detailed Report and Show Bad Items

Adding Public Folder Migration Job

Just like adding the Mailboxes Migration Job, you can add Public Folder Migration Job to migrate only Public folders to the target Office 365 destination.

Select Add Job for Public Folders from Add Job option on the tool bar. Now, perform the same steps as for the Add Job for Mailboxes for public folders migration.

The post Step by Step Guide for Migrating Office 365 to Office 365 Tenant Part-2 appeared first on Kernel Data Recovery.

Step by Step Guide for Migrating Office 365 to Office 365 Tenant Part-3

$
0
0

While, you have studied the Pre-migration Analysis, Settings, Migration Process in earlier parts, the concluding part includes all the post migration jobs which users can utilize for their benefits.
Let us understand how to perform and utilize these post-migration jobs further in this section.


Post Migration Jobs

The jobs that user can perform after successful Office 365 to Office 365 migration are designated under –

  • Outlook Rules Migration
  • Outlook Folder Permissions Migration
  • Report Console

Let us go through the functions and understand their use one-by-one.

Outlook Rules Migration

Once the migration of Office 365 to Office 365 is completed, you can directly migrate Outlook Rules for Source to Target client using this tool.

Note: Before performing Outlook Rules migration procedure, confirm that Job Synchronization process is Stop. If ignored, it would hinder the start of Outlook Rules migration job.

Now, carry on the job with following steps one-by-one.

  1. Click Outlook Rules and Permissions option from the left panel. Select Rules Migration and click + to add a Rules Migration job.
  2. Select your Project Name from the drop-down list for which Rules Migration job is to be created. Then, click Start.
  3. A dialogue box asking for confirmation will be displayed. To confirm, click Yes.

  4. A wizard with Rule migration job information is displayed. Click Next to continue.
  5. In the next wizard, the mailboxes are already mapped as you have mapped while adding the job. Also, there is no provision to change the mapping here.
  6. Select the desired mailboxes and click Next to start the Outlook Rules migration job.

  7. Outlook Rules will be migrated from Source Office 365 account to Target Office 365 account successfully. You can see Export Details as well. Click Finish to complete the process

Hence, Outlook Rules are migrated from Source to Target successfully.

Outlook Folder Permissions Migration

Similarly, you can migrate Outlook folder permissions from your Source Office 365 mailboxes to Target Office 365 mailboxes easily with this software.

Just select Folder Permissions Migration from the drop-down. Click + button to add the folder permissions migration job.

All steps are same, except the one that Source and Target mailboxes mapping is allowed here. You can map mailboxes for folder permissions as per your requirements. Mapping can be performed through user name, user SID or through CSV.

After mapping, click Next and your folder permissions are migrated successfully in minimal time.

Report Console

Through Report Console, you can view detailed status of all job created by Kernel Migrator for Exchange.
You can see the report by launching a web browser and visiting the URLs https://localhost/LEMRV/login.aspx and https:///LEMRV/login.aspx (if accessing from any other system)

Note: You cannot open Report Console on system where Exchange Server is installed.

Enter the URL and a login page appears. Enter the login details User name and password set during Report Console Settings in first part of the guide.

You can see Project Details, Small Report and Large Report as per your desire. Here is an example of Large Report for the users.

Conclusion

With Kernel Migrator for Exchange, all types of migration i.e. Exchange and Office 365 migration, Exchange and Exchange migration, Office 365 and Office 365 migration in all domains becomes an easy task.

Exchange Migrator software helps users save their time and pre-plan the migration with Pre-migration Analysis facilities. It also facilitates advanced settings. Migration of Office 365 mailboxes and public folders to other Office 365 account can be performed in easy, non-complex steps. While the migration procedure is smooth, the users have the privilege for migrating Outlook rules, Outlook folder permissions and view complete job reports through advanced Report Console online.

Having all such features in a single tool with simple executional steps makes Kernel Migrator for Exchange a unique, attractive tool for the users.

The post Step by Step Guide for Migrating Office 365 to Office 365 Tenant Part-3 appeared first on Kernel Data Recovery.

How to Migrate from Exchange On-Premises to Exchange Online in a Hybrid Environment?

$
0
0

In a hybrid Exchange deployment scenario, you often have to move mailboxes from on-premises Exchange to Exchange Online. In this, you can move your mailboxes to Exchange Online and then import the mailbox data to them (this procedure is different from that for a complete Exchange to Office 365 migration).

On-premises Exchange to Exchange Online Migration in a hybrid environment

In a hybrid Exchange deployment, on-premises Exchange mailboxes can be migrated to Exchange Online from Exchange Admin Center (EAC). This is done by creating and managing migration batches.

Prerequisites

  • Hybrid deployment configuration between on-premises Exchange and Exchange Online organizations.
  • Organization Management and Recipient Management permissions for the account performing the migration
  • Mailbox Replication Proxy Service (MRSProxy) enabled on client access servers (for Exchange 2013)

How to perform migration using EAC?

  1. Endpoint Creation
  2. As the first step for executing on-premises Exchange to Exchange Online migration, you need to create migration endpoints. By migration endpoints, we mean the connection settings of the on-premise Server that runs MRS proxy service. This is required to perform to and fro migrations between Exchange on-premises and Exchange Online.

  3. Enabling Proxy Server
  4. In Exchange 2013, you need to enable MRS Proxy service on on-premises Exchange 2013 Client Access Servers. Follow the steps as:

    Open Exchange Administrator Center, move to Servers> Virtual Directories, choose Client Access Server, select EWS virtual directory and edit EWS Virtual directory to enable MRS Proxy Service.

  5. Using EAC to migrate Exchange mailboxes to Office 365
  6. Follow the steps to migrate Exchange on-premises mailboxes to Exchange Online:

    Step 1. In EAC, go to Office 365.

    Step 2. Go to Recipients>Migration.

    Step 3. Click Add+ and then click Migrate to Exchange Online.

    Step 4. From Select a Migration Type window, select Remote Move Migration and click Next.

    Step 5. In Select the users window, click Add+ option, select the users that are to be migrated. Then, click Add, click OK, and then click Next.

    Step 6. In Enter the Windows user account credential window, provide required credentials of your on-premises account and then click Next.

    Step 7. In the Confirm the migration endpoint window, check if FQDN of the on-premises Exchange Server is listed. Click Next.

    Step 8. Next, in the Move Configuration window, enter the migration batch name and other details. Click Next.

    Step 9. Now, select the archive mailbox migration option as required and enter the target database name. Click Next.

    Step 10. After this, go to Start the Batch page and select a recipient (that will get the reports). Select the options Automatically start the batch option and Automatically complete the migration batch and click New.

  7. Removal of Migration Batches
  8. After the completion of the migration, you may remove the migration batches to avoid errors in future migrations:

    Open EAC and go to Office 365, Select Recipients> Migration, click Completed Migration Batch, select Delete. Finally click Yes to delete.

  9. Re-enabling Offline Access for Outlook (OWA) on Web
  10. Now you can enable offline access to Outlook on the web. This will allow users to access mailboxes even if they are not connected to a network.

    This action will make your mailboxes available offline in Outlook on the web. The manual way for migration of Exchange mailboxes is hence executed.

Limitations of the EAC method for migration

The time required for the mailbox migration depends on the number of mailboxes in the migration batch. However, this method is, though seems easy, has some limitations too:

  • It is complex for novice and non-technical users
  • Is prone to manual errors

So, it is recommended to go for a third-party tool that performs the automatic migration. Kernel Migrator for Exchange is a specially designed Exchange Migration tool for all types of Exchange and Exchange Online migrations. Migration of on-premise mailboxes to Office is an easy task with this tool.

Conclusion

Though EAC-based mailbox migration from Exchange on-premises to Exchange Online seems to be easy in a hybrid environment, it has many issues. So, it is recommended to try third-party tools like Kernel Migrator for Exchange.

The post How to Migrate from Exchange On-Premises to Exchange Online in a Hybrid Environment? appeared first on Kernel Data Recovery.

Exchange 2010 Support to End – Time to migrate to Office 365/Exchange 2016

$
0
0

Microsoft usually stops support for its products after they complete a decade after their release. It then focusses on the newer versions of such products. Here is a brief history of Exchange Server releases and end of support dates:


Table 1.
Life Cycle History of Exchange Server

Product
Released

Life Cycle
Start Date

Main Stream
Support Date

Extended
Support End Date.

Exchange
Server 2003 Server Pack 2

10/19/2005

4/14/2009

4/8/2014

Exchange
Server 2007 Enterprise Edition

3/8/2007

Not Applicable

Not Applicable

Exchange
Server 2007 Service Pack 3

6/7/2010

4/10/2012

4/11/2017

Exchange
Server 2007 Standard Edition

3/8/2007

Not Applicable

Not Applicable

Exchange
Server 2010 Enterprise

11/9/2009

1/13/2015

1/14/2020

Exchange
Server 2010 Server Pack 3

2/12/2013

1/13/2015

1/14/2020

Exchange
Server 2010 Standard

11/9/2009

1/13/2015

1/14/2020

Exchange
Server 2013 Enterprise

1/9/2013

4/10/2018

4/11/2023

Exchange
Server 2013 Service Pack 1

2/25/2014

4/10/2018

4/11/2023

Exchange
Server 2013 Standard Edition

1/9/2013

4/10/2018

4/11/2023

Exchange
Server 2016 Enterprise Edition

10/1/2015

10/13/2020

10/14/2025

Exchange
Server 2016 Standard Edition

10/1/2015

10/13/2020

10/14/2025

The life cycle of Exchange Server 2010 shows that its extended support will end on January 14, 2020. After the date, there won’t be technical support or updates for this version.

What does the end of Exchange 2010 support mean?

After January 14, 2020, the Exchange 2010 users may continue to work on it, but there won’t by any support from Microsoft. It means if there is any technical errors or bugs, then you will be on your own. That is why it is better to upgrade Exchange 2010 to either 2013,2016 or Office 365. There are multiple methods to accomplish the migration depending on the size of the Exchange environment and number of mailboxes.

Migrate Exchange 2010 to Office 365

If you want to follow the recent trend of migrating on-site resources to a cloud platform, then Office 365 is the best option for you. You can try different types of migrations depending on the number of mailboxes –

  • Cutover (Express) migration
  • Staged migration
  • Hybrid migration

Cutover (express) migration

Cutover migration is useful when there are lesser than 2000 mailboxes in Exchange. Here are the main steps of cutover migration which you need to follow to migrate Exchange mailboxes to Office 365 –

  1. Inform the Exchange users about the proposed migration.
  2. Complete all the prerequisites on the server.
  3. Verify your Office 365 domain.
  4. Create an empty security group (mail-enabled) in Office 365.
  5. Create migration endpoints.
  6. Migrate batches of Exchange mailboxes to Office 365.
  7. Verify the migration and delete the migration batch.
  8. Finish the post-migration tasks and inform users of new credentials.

Staged Migration

Staged migration only works for Exchange 2003 and 2007 and is recommended when the number of mailboxes is more than 2000. Here are the important steps –

  1. Synchronize user lists in Exchange and Office 365.
  2. Create a CSV file which lists the credentials of mailboxes you want to migrate.
  3. Run a staged migration to migrate emails, contacts, and calendars.
  4. Send the migration reports and complete post-migration tasks.

Hybrid migration

Hybrid migration is performed when you have an Exchange/Office 365 Hybrid configuration. In this case, migration can be done form EAC. And it works in following conditions –

  • You are using Exchange 2010, 2013, or 2016.
  • You want to migrate quickly.

Migrate from Exchange 2010 to Exchange 2013

Migrating Exchange 2010 to Exchange 2013 is not that popular as Exchange 2010 to Exchange 2016 migration. Here is a brief procedure for updating Exchange 2010 to 2013 –

  1. Complete the prerequisites.
  2. Configuring Offline Address book.
  3. Install Exchange server 2013.
  4. Add the digital certificates and configure virtual directories.
  5. Move the Exchange 2010 mailboxes to Exchange 2013.
  6. Enable Outlook Anywhere.
  7. Migrate public folder data from exchange 2010 to 2013.
  8. Complete the post-migration tasks.

Migrate Exchange 2010 to Exchange 2016

Migration of Exchange 2010 to Exchange 2016 follows the same procedure of migration with the help of following steps –

  1. Complete the prerequisites of Exchange server.
  2. Prepare Active Directory.
  3. Install Exchange Server 2016.
  4. Configure Exchange services.
  5. Migrate the mailboxes and public folders.
  6. Complete the post-migration tasks.

All the above-given methods are used in different situations, and an Exchange administrator can choose the desired method as per his situation. But these methods involve many complex steps and so completing the migration will require a lot of time and resources. So, it is better to take the assistance of a professional tool like Kernel Migrator for Exchange which removes all complexities and performs direct migration. You can migrate your Exchange (on-premises) data to Exchange/Office 365 or vice-e-versa using this Exchange migration tool.

The post Exchange 2010 Support to End – Time to migrate to Office 365/Exchange 2016 appeared first on Kernel Data Recovery.

4 Things to Prepare Yourself for Exchange 2019 Migration

$
0
0

In 2017, Ignite conference was held by Microsoft at Orlando, Florida, in which they announced the release of Exchange 2019. One reason for this upgrade is that many enterprises are still not willing to use Exchange as a cloud service. So, a new version of Exchange is a reliable option for them. But, what features will be offered in Exchange 2019? It has not been revealed by Microsoft yet.

However, if you’re planning to migrate to Exchange 2019, then there are some things you should keep in mind.

  1. Migrating from a Much Older Version
  2. The first thing that you need to keep in mind is that in-place upgrades of Exchange Server are not possible, which means you may not be able to upgrade from Exchange Server 2010 and previous versions to Exchange Server 2019. So, if you’re using Exchange Server 2007 or 2010, first you’ve to upgrade to Exchange 2013 or 2016 and then migrate to Exchange 2019.

  3. Administration Issues
  4. When Microsoft announced the release of Exchange 2019, it was a great relief to administrators, as they don’t have to move to Office 365 from their familiar on-premises environment. But, it is not clear yet, whether Exchange 2019 will resolve some of the problems Exchange administers face. These problems include difficulties in migration, compatibility with .NET 4.7, client support issues, AD support issues, etc.

  5. End of certain features
  6. It is possible that RPC-over-HTTP will be removed entirely for MAPI over HTTP protocol. So, Outlook Anywhere will be removed from the server side for MAPI virtual directory.

  7. Minimum Supported Email Client
  8. It has been learned that the minimum email client supported in Exchange 2019 will be Outlook 2013. So, if you’re going to upgrade to Exchange 2019, then you’ll have to update the Office suite too.

As of now, it is not clear what all features will be offered in Exchange 2019. But, as an organization, you can still be prepared for the upcoming changes.

Also, migrating from Exchange Server is a complicated process; it requires adequate knowledge and technical expertise. So, think of using Kernel Migrator for Exchange, an effective Exchange migration tool that can help you migrate from an older Exchange to Exchange 2019 easily.

The post 4 Things to Prepare Yourself for Exchange 2019 Migration appeared first on Kernel Data Recovery.

Viewing all 78 articles
Browse latest View live


Latest Images